
Arsenal 2-2 Bayern Munich – Match Analysis
Arsenal 2-2 Bayern Munich – Match Analysis
Mid-blocks, pressing traps & shaky execution lead to a ropey draw at the Emirates.

A clinical and unrelenting Bayern side provided an incredibly stern examination of Arteta’s nervy and, in the end, wasteful Gunners. Here’s my dive into how Tuchel looked to neutralise Arsenal and how the hosts couldn’t quite make the right puzzle pieces fit together.
1st half
Bayern’s mid-block
In my piece on the Brighton match, I highlighted how easily Arsenal were able to establish full control of the opposition’s third once they circumvented the press.
Here’s a snap from the match. This easy overload that facilitated control of the right-back pocket – deep of their midfield but to the side of the strikers – allowed for so much easy access to the #6 space and beyond.
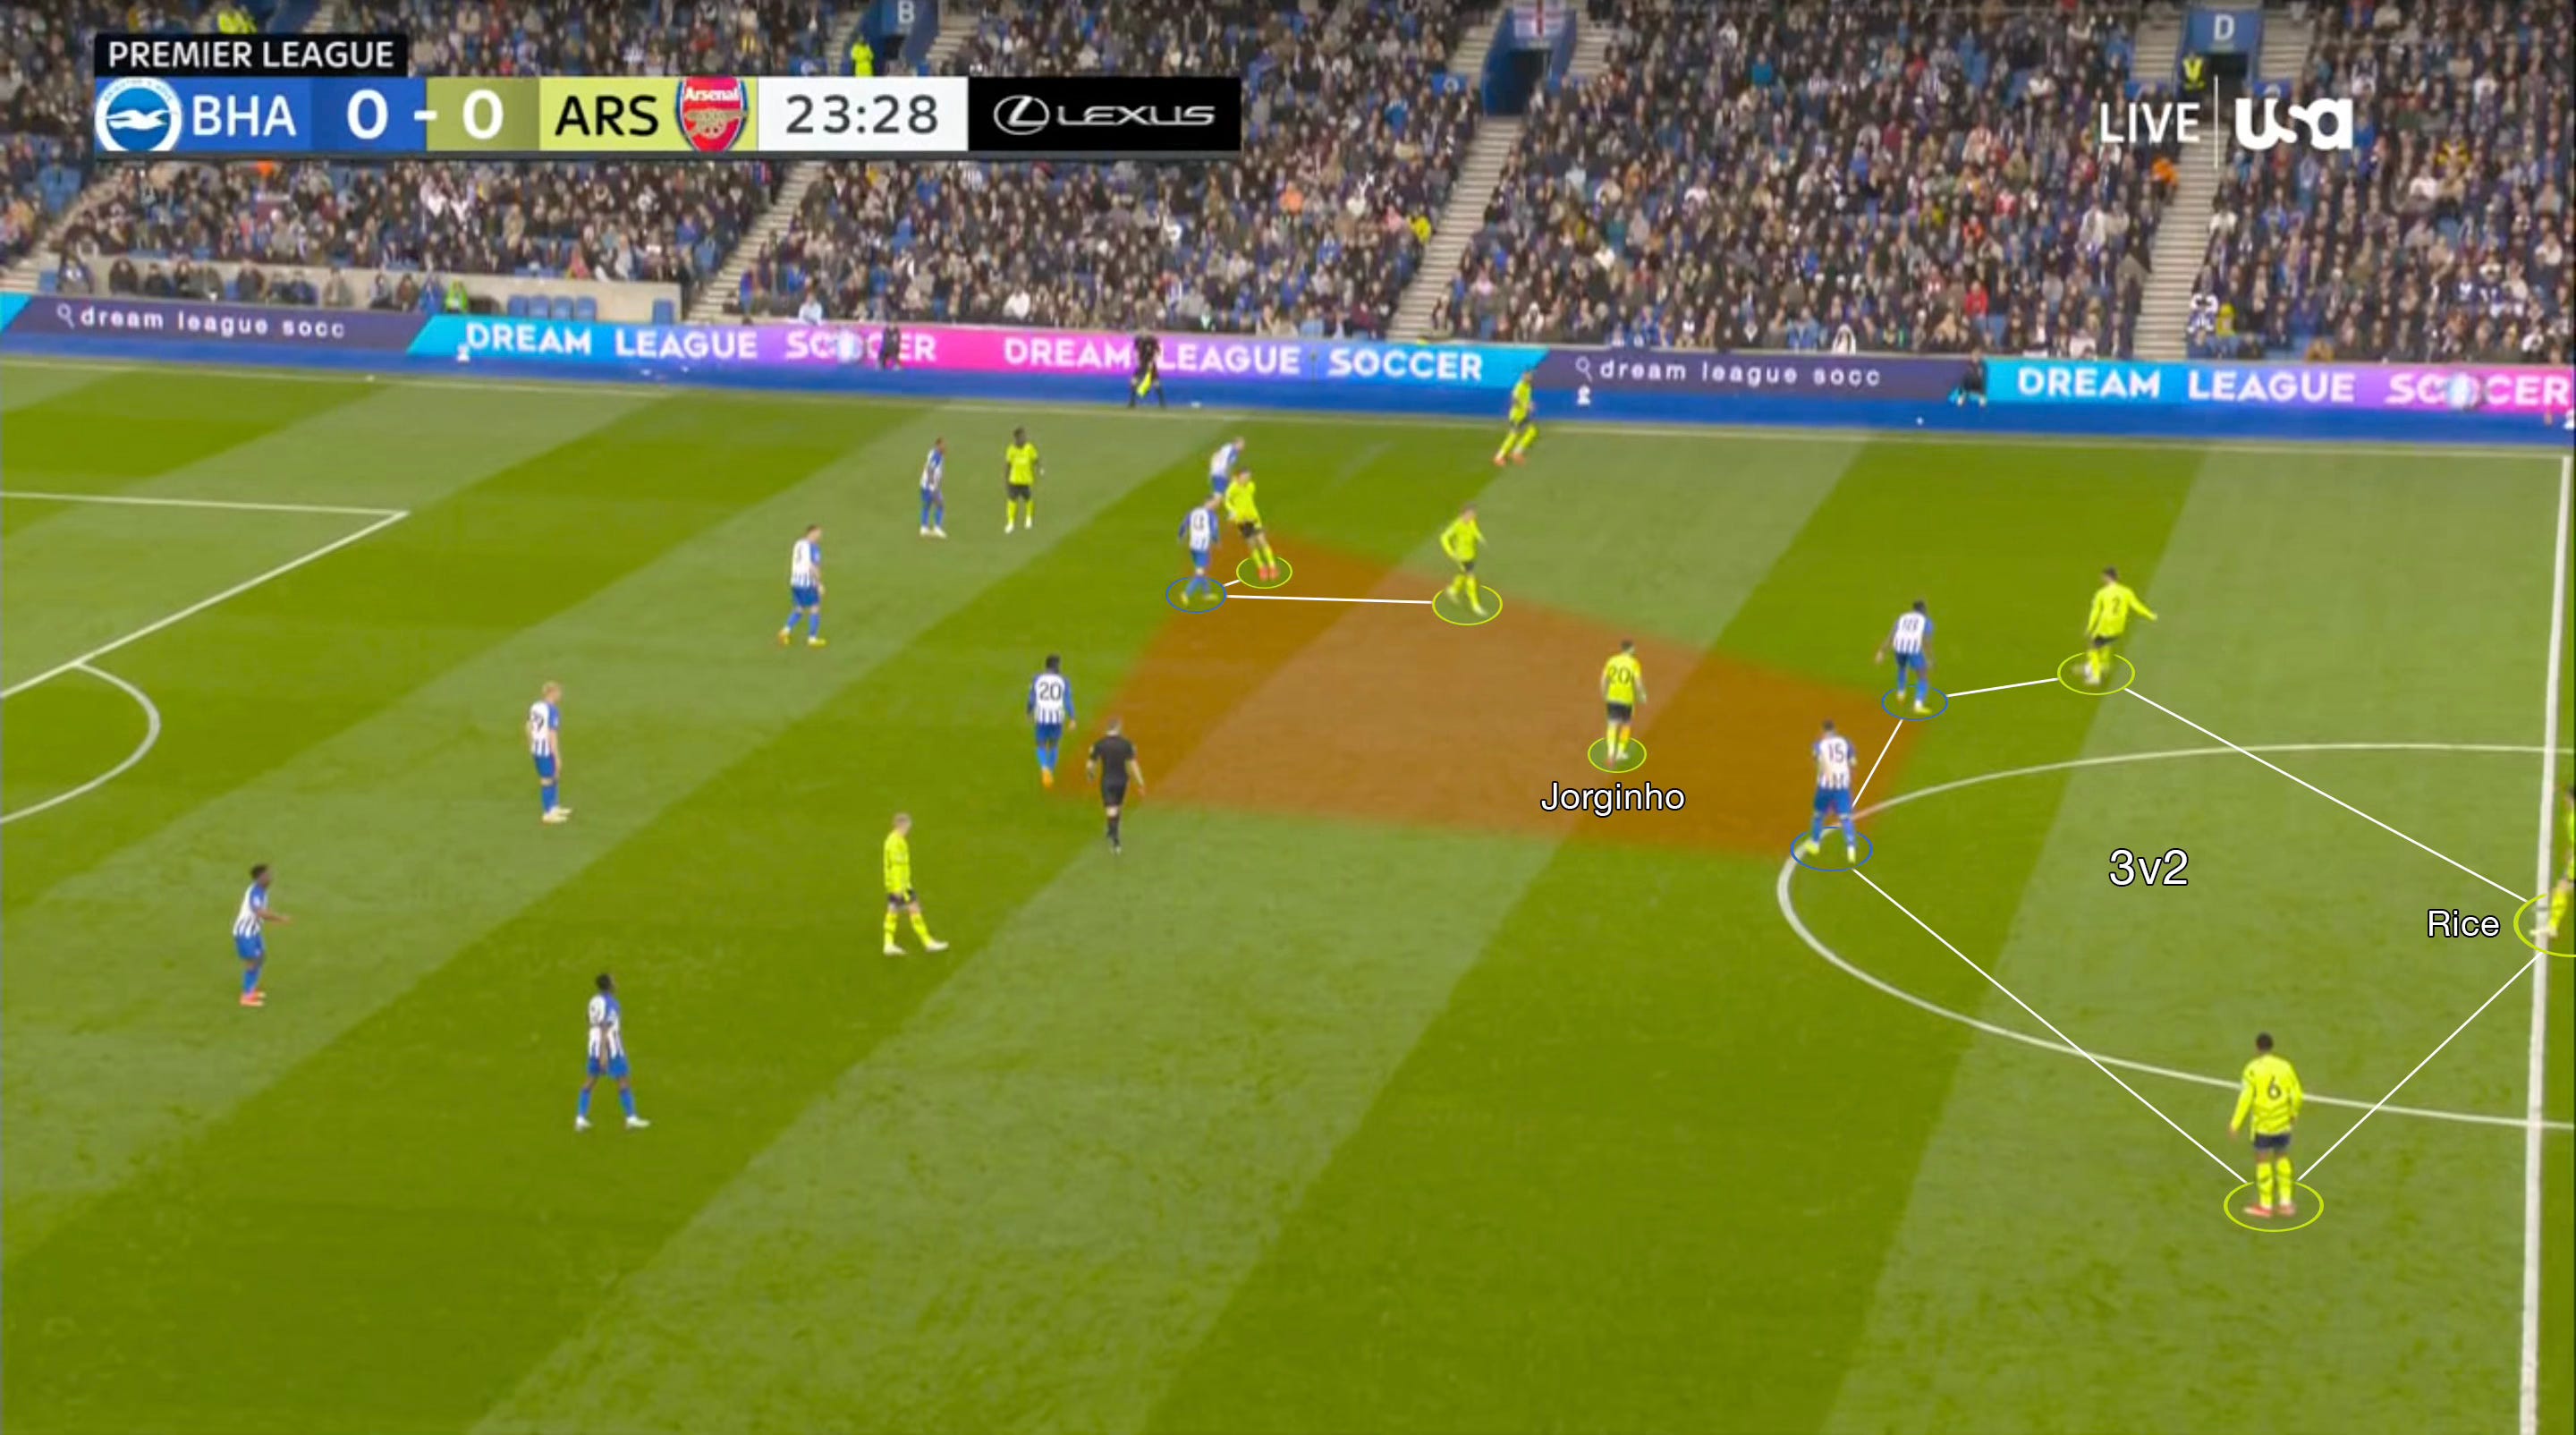
With that in mind, Tuchel focused his side’s defensive efforts on snuffing out this phase of play so that Arsenal couldn’t dominate the final third in the way they had done. All the energy put into high-pressing by Brighton was instead put into compacting the shape and pressing specific individual receivers.
Most of the 1st half’s play came down Arsenal’s right, so that’s what I’ll talk about for now.
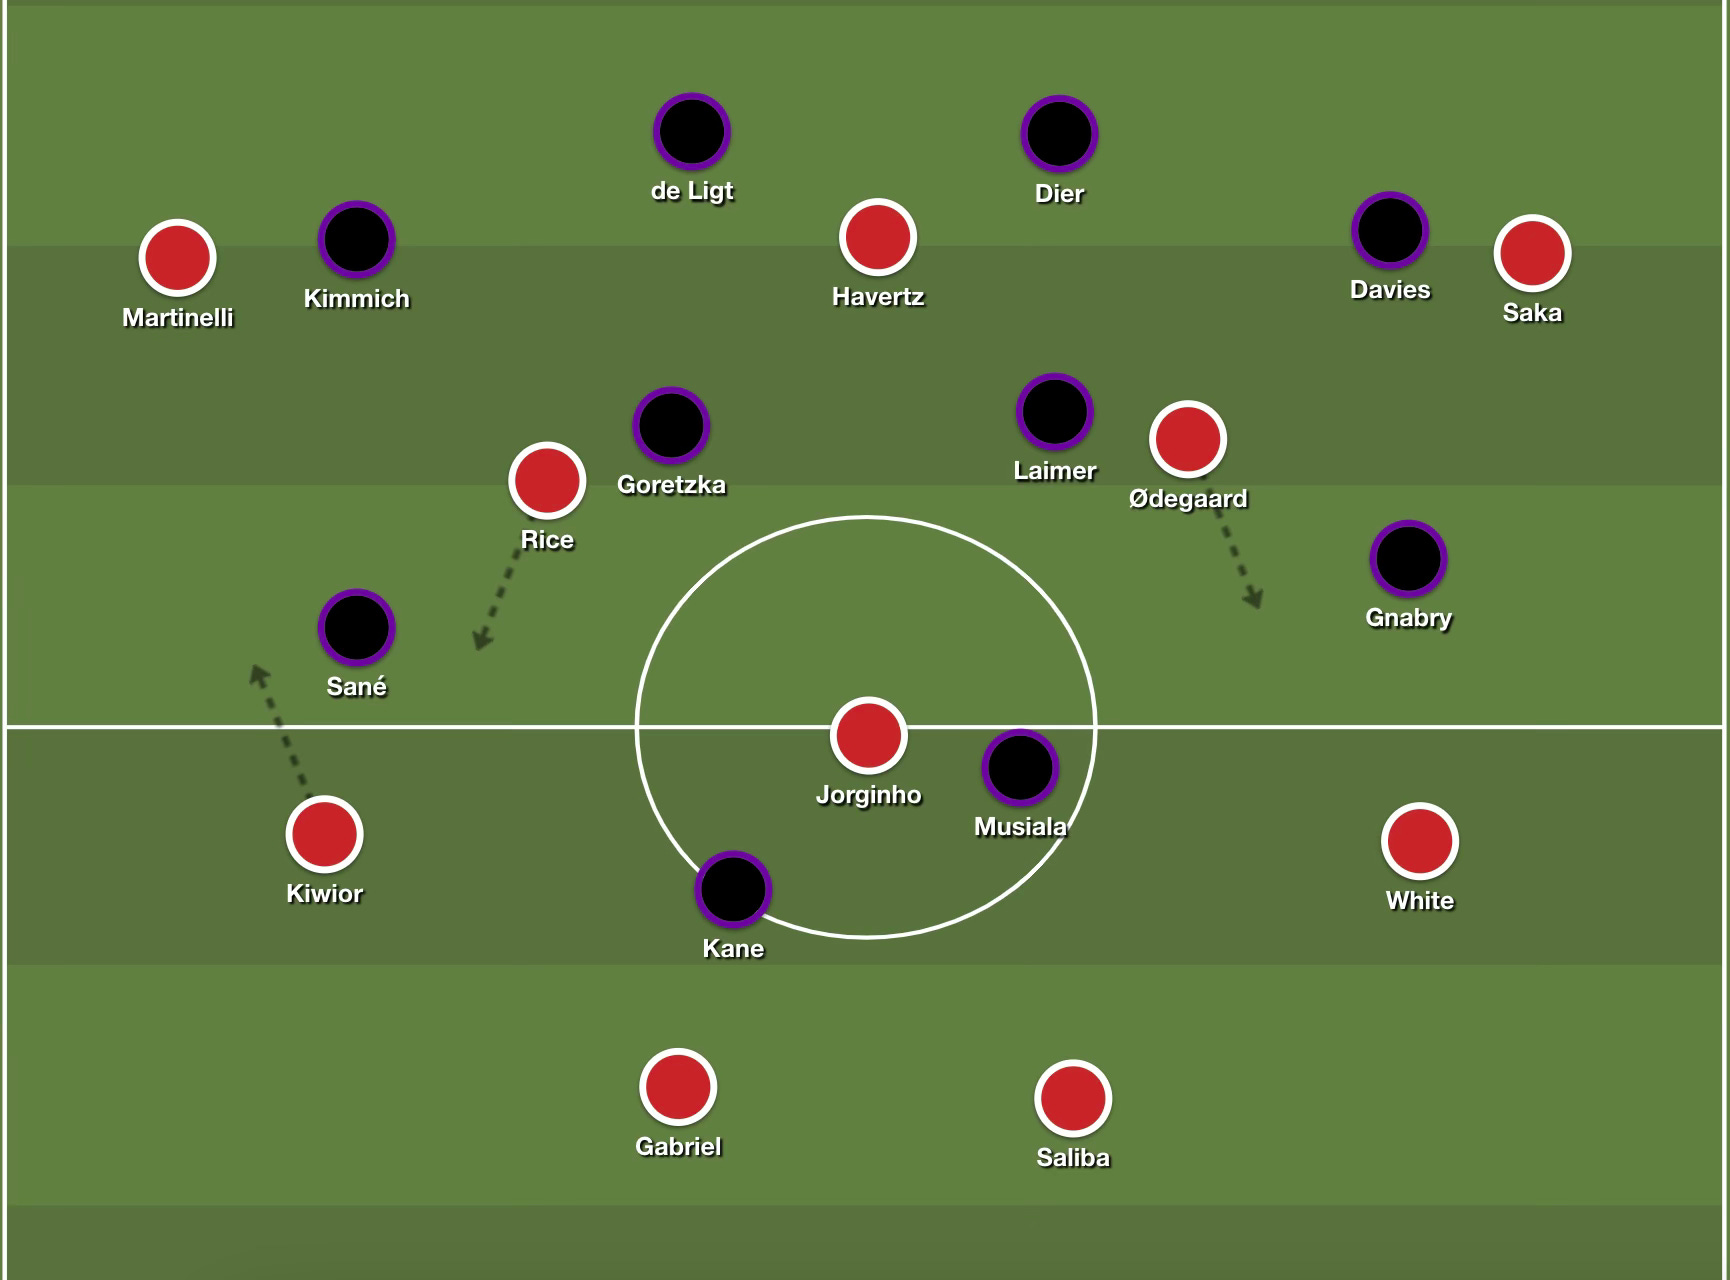
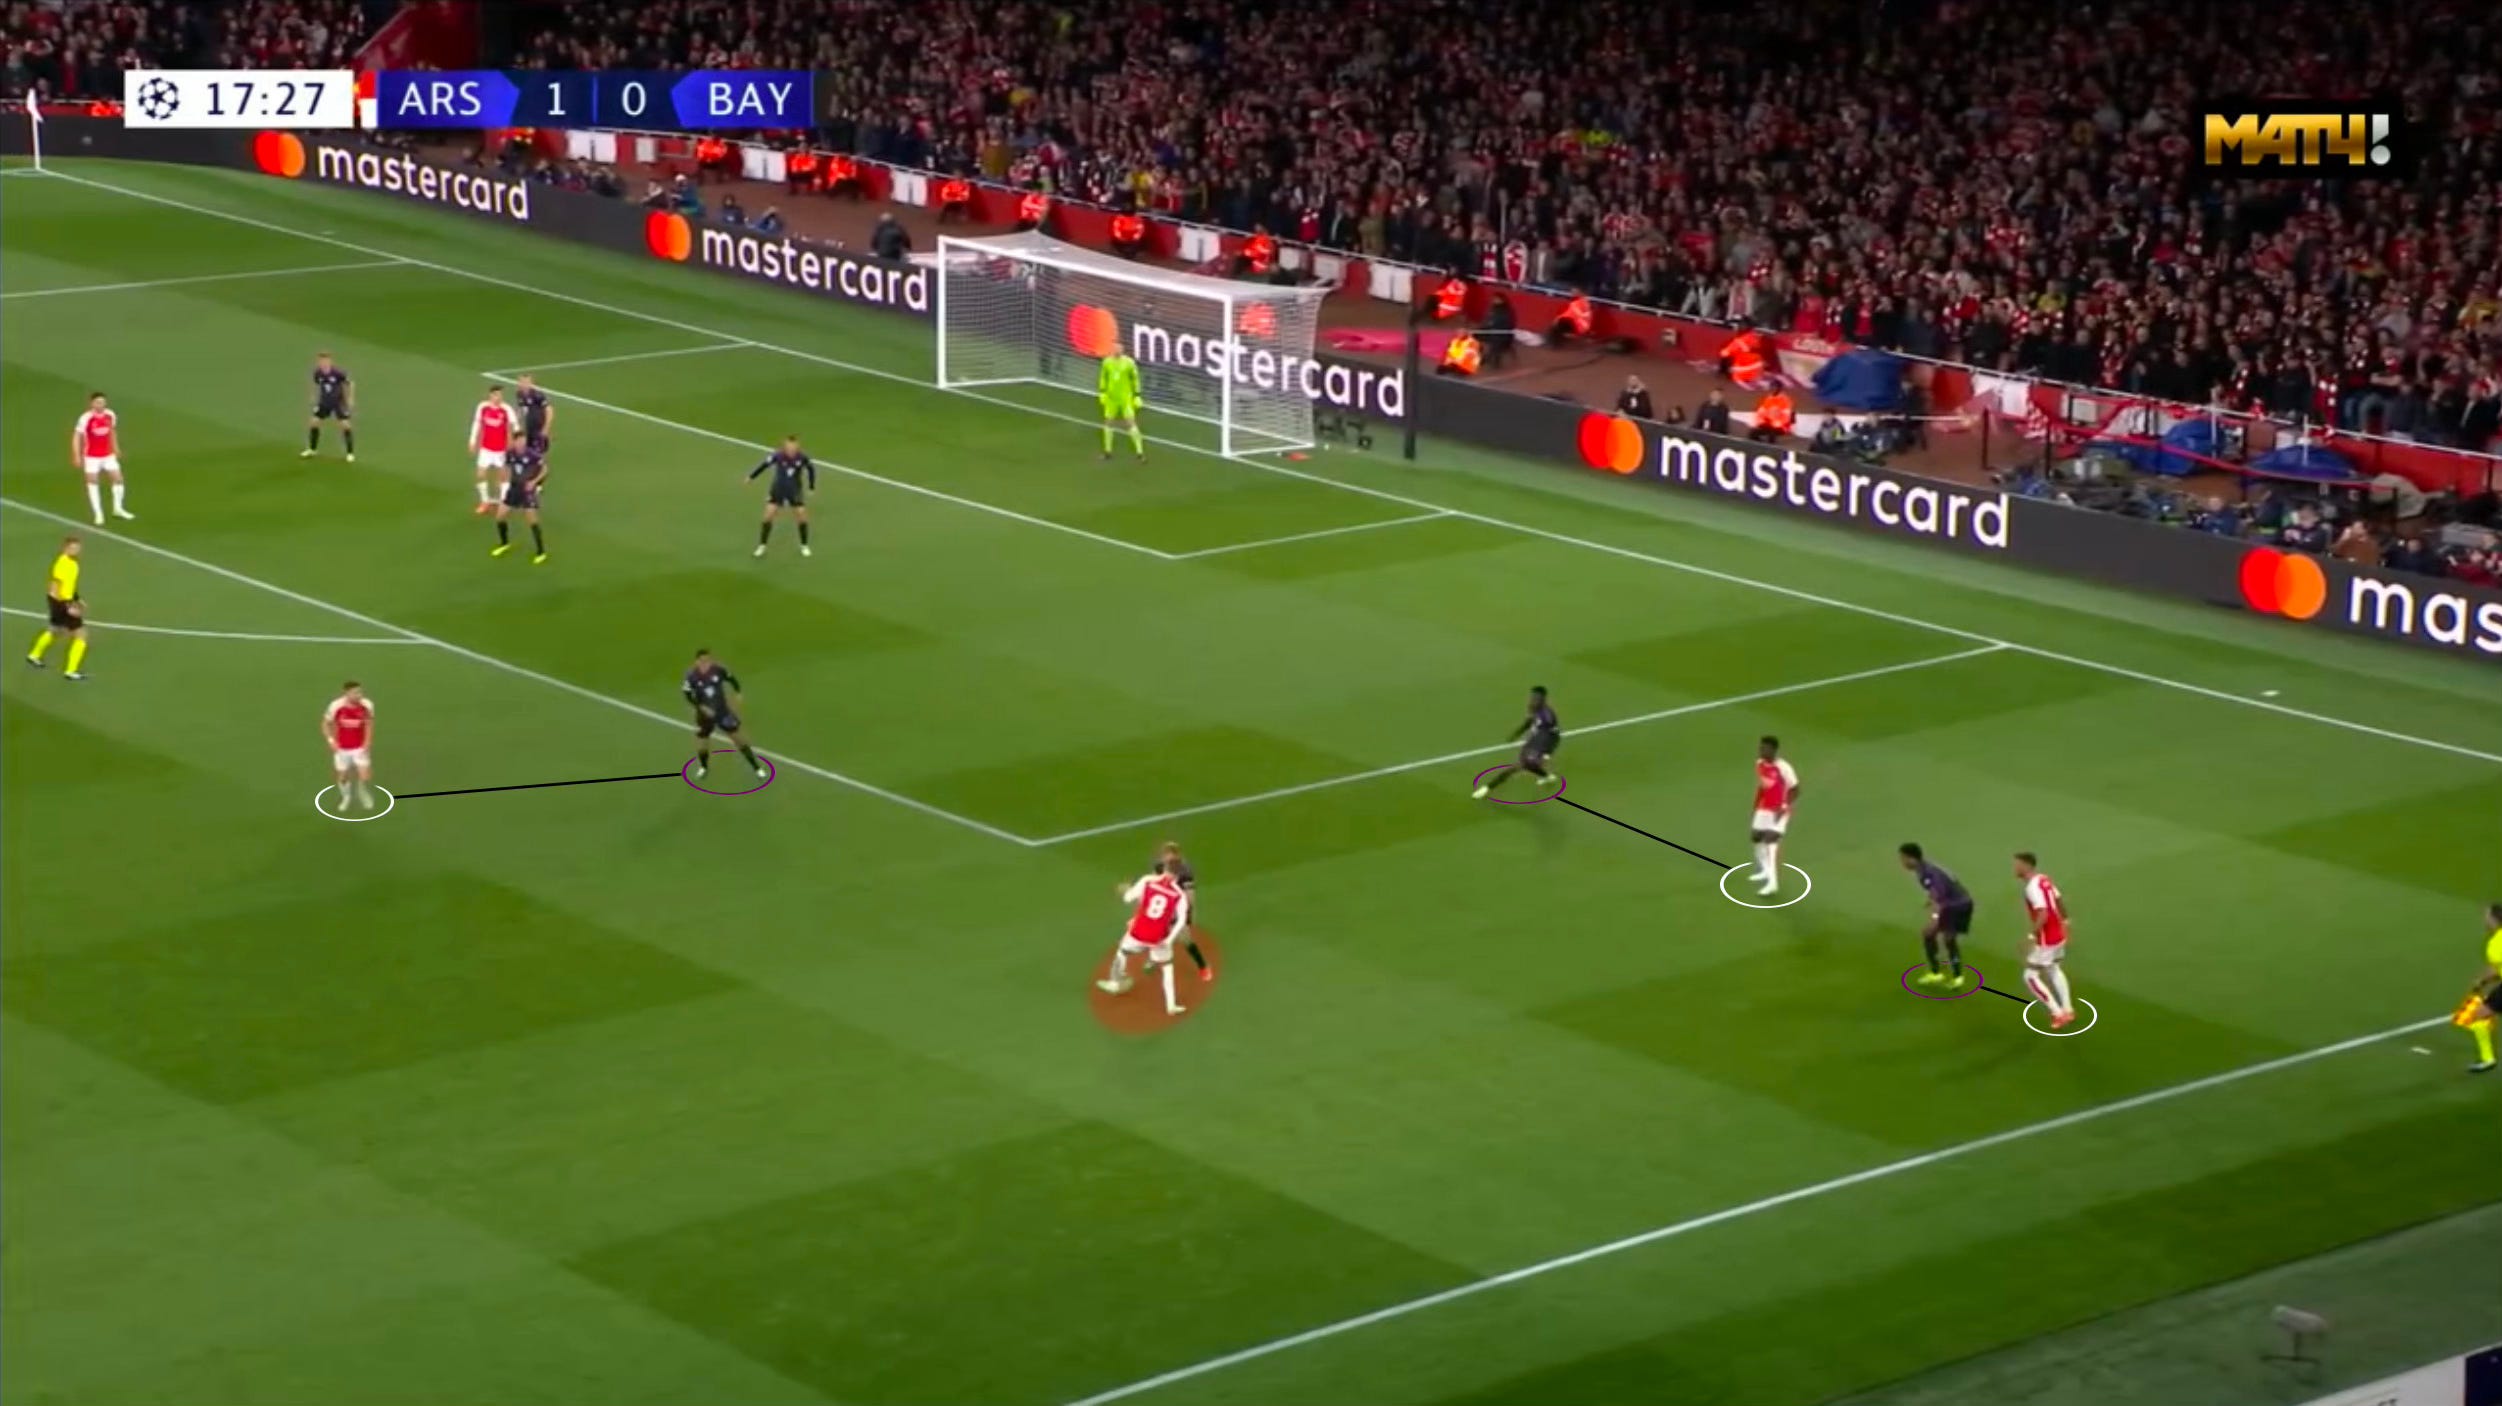
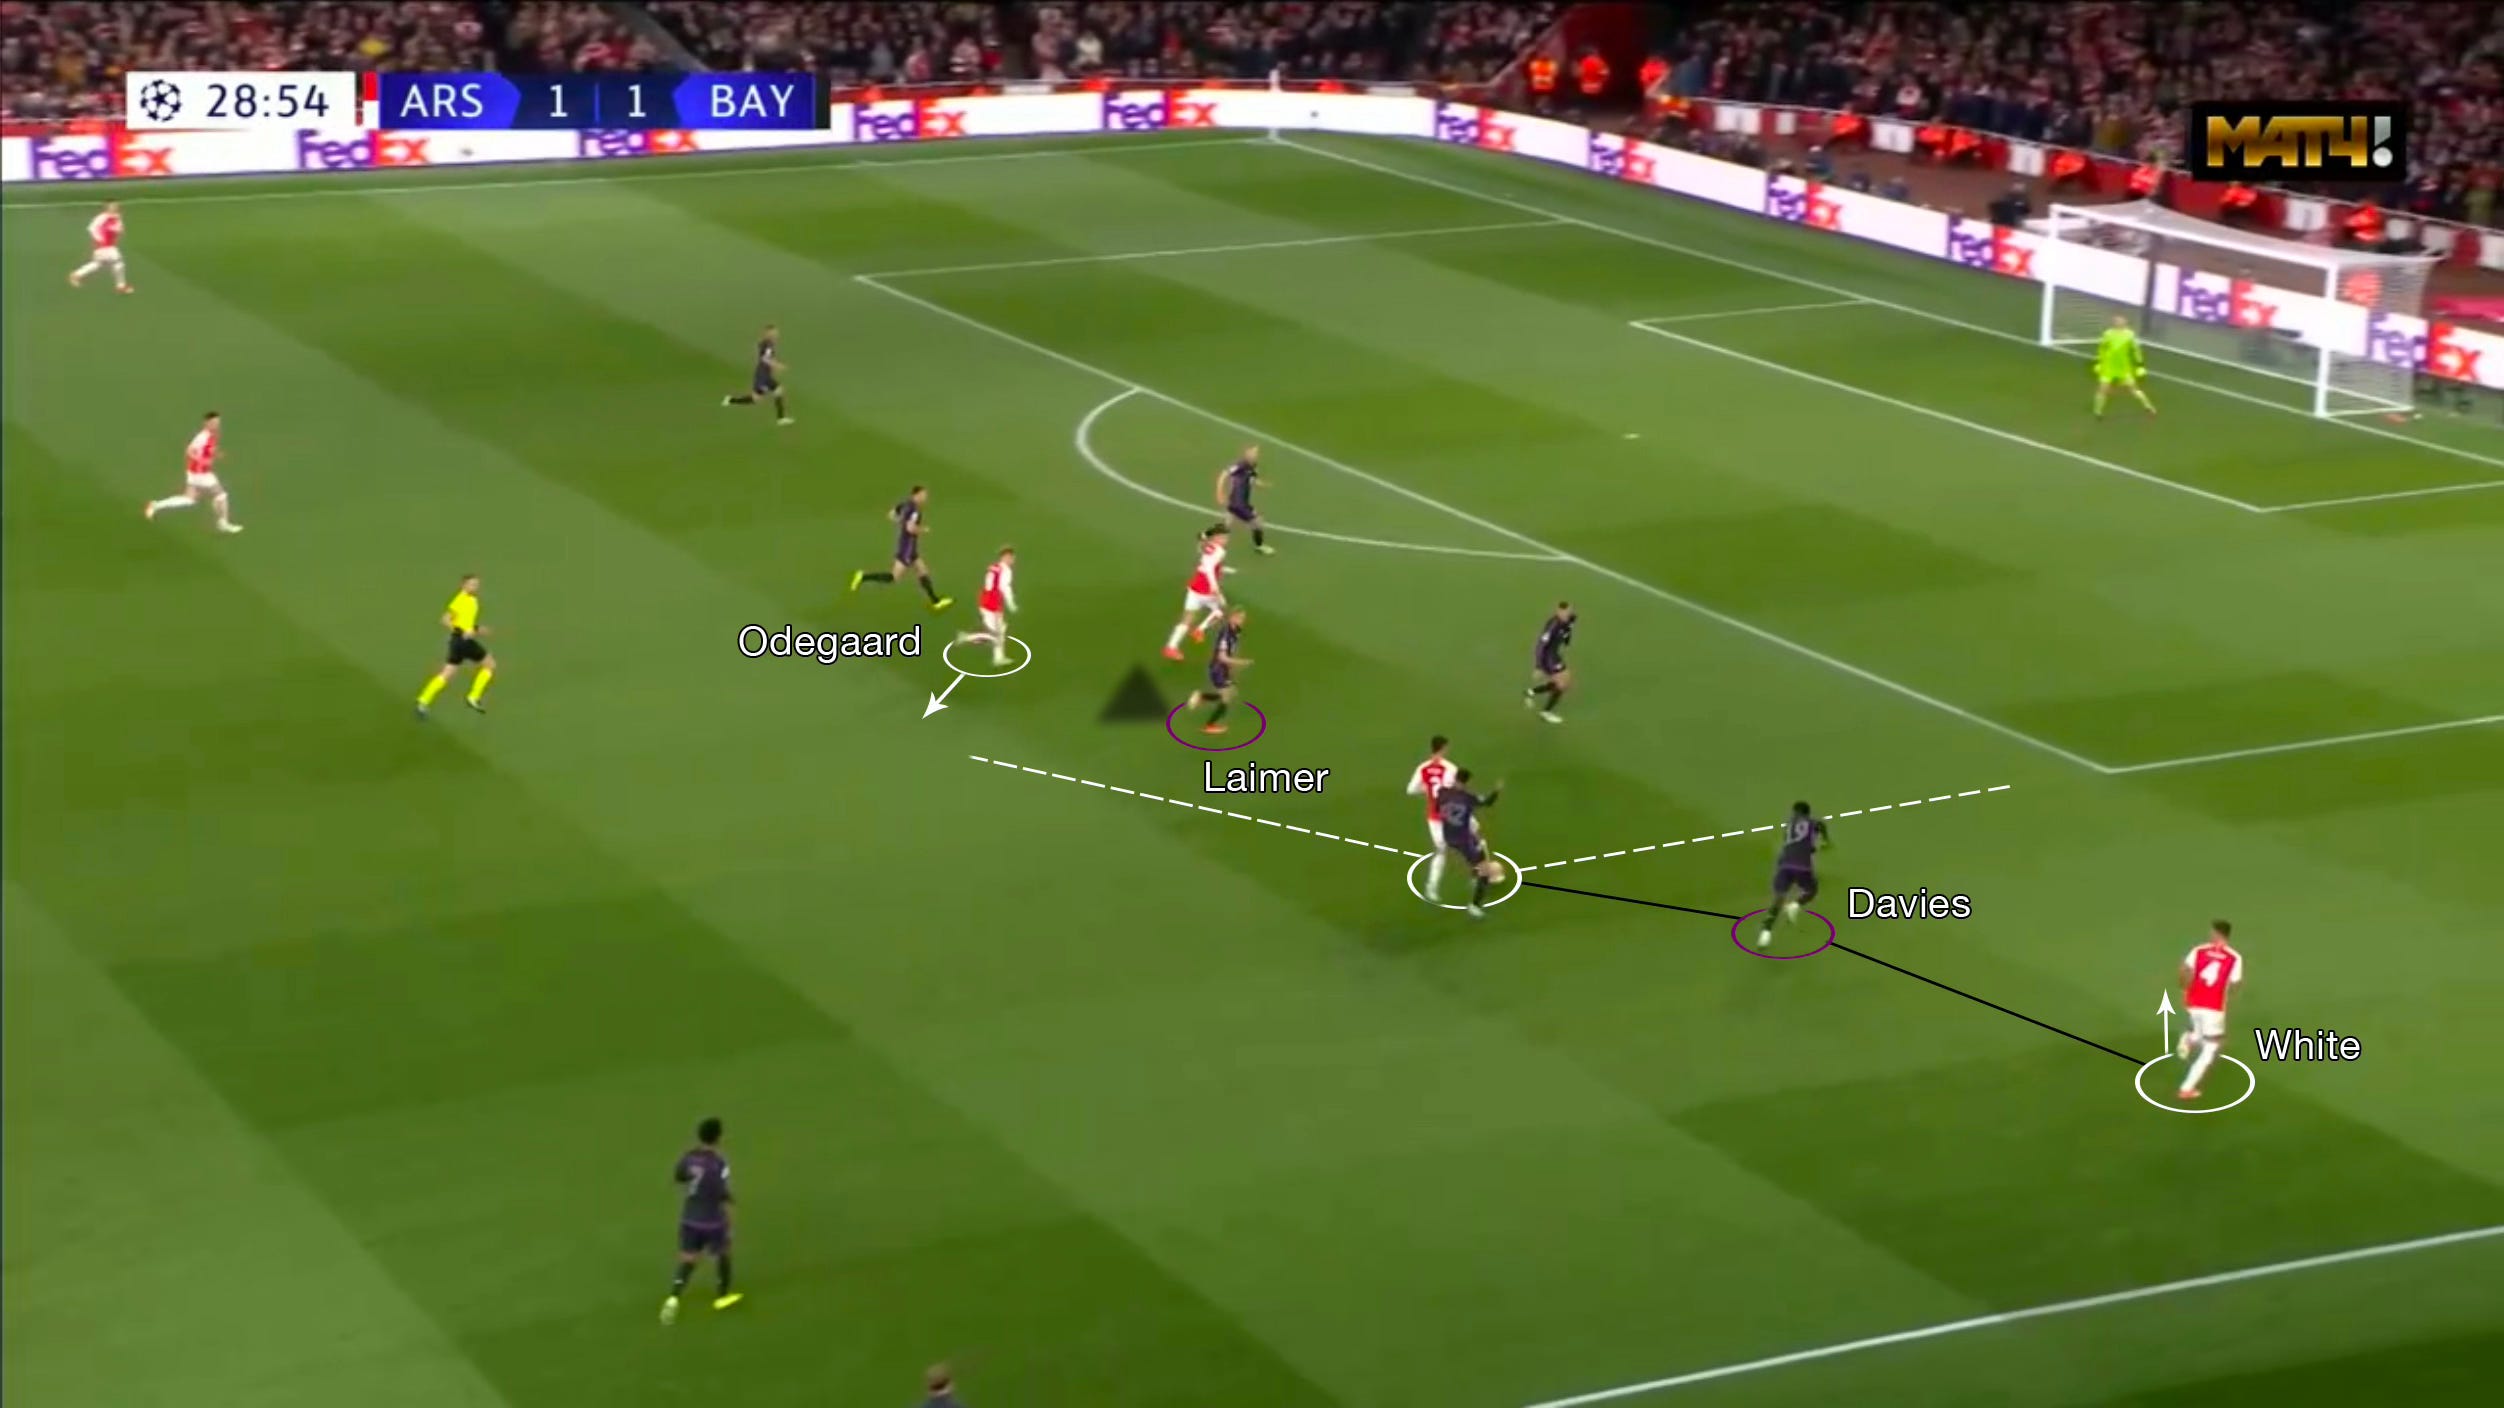
The aim from Bayern was to remove all of that time and space those players had to be able to dictate the game. They did so by getting extremely tight to the key individuals – Ødegaard, Saka, White, Havertz & Jorginho.
Laimer was tasked with pressing Ødegaard, even as deep as the 1st line. Gnabry was glued to White and Davies to Saka. Dier would get as tight to Havertz, within reason, as he could whenever he populated the right side. Musiala’s role had a fraction more ambiguity, as he would hold zonally to be able press out but most of his effort went into backwards pressing, meaning access into Jorginho was either unachievable or made to be a risk.

Arsenal, like on Saturday, flaunted many variations to their buildup shapes and patterns as they looked to answer some difficult questions. With how committed Bayern were to closing these players down, it made their shape exploitable. If White dropped deep, it meant Bayern were holing a 4-2-4; if White pressed up alongside Saka, they were then a 6-2-2. And, with Ødegaard’s forays here, there and everywhere, their double pivot could often be almost as split as Gnabry and Sané were from one another.
Given the Swiss army knife that Arsenal’s attack has become, they were always going to find potential solutions to the minute trade-offs of Bayern’s strong approach, but the semantics involved with executing them were pivotal to both their successes and shortcomings.
Here are different looks at how the home side went about tackling the conundrum.
1st example
To begin with, Kiwior was the 3rd man at the back, allowing Martinelli to bear the width on the far side. Elsewhere, Ødegaard sat in the double pivot, which kept Laimer at bay.
The main highlights here come from Saliba and the tracking of the wide men. Gnabry had briefly lost sight of White but was quick to get back as soon as the danger of his run arose, whilst Davies stuck very tight to Saka’s counter movement short.
Since Saliba offers the least threat on the ball down that side, Musiala only tentatively closed him down, and for good reason in the end. With players so tightly marked, the margins aren’t big, so the passes need to be close to perfect. Beyond just overcooking the pass, Saliba’s technique makes it difficult as his ball is always drifting wide.

2nd example
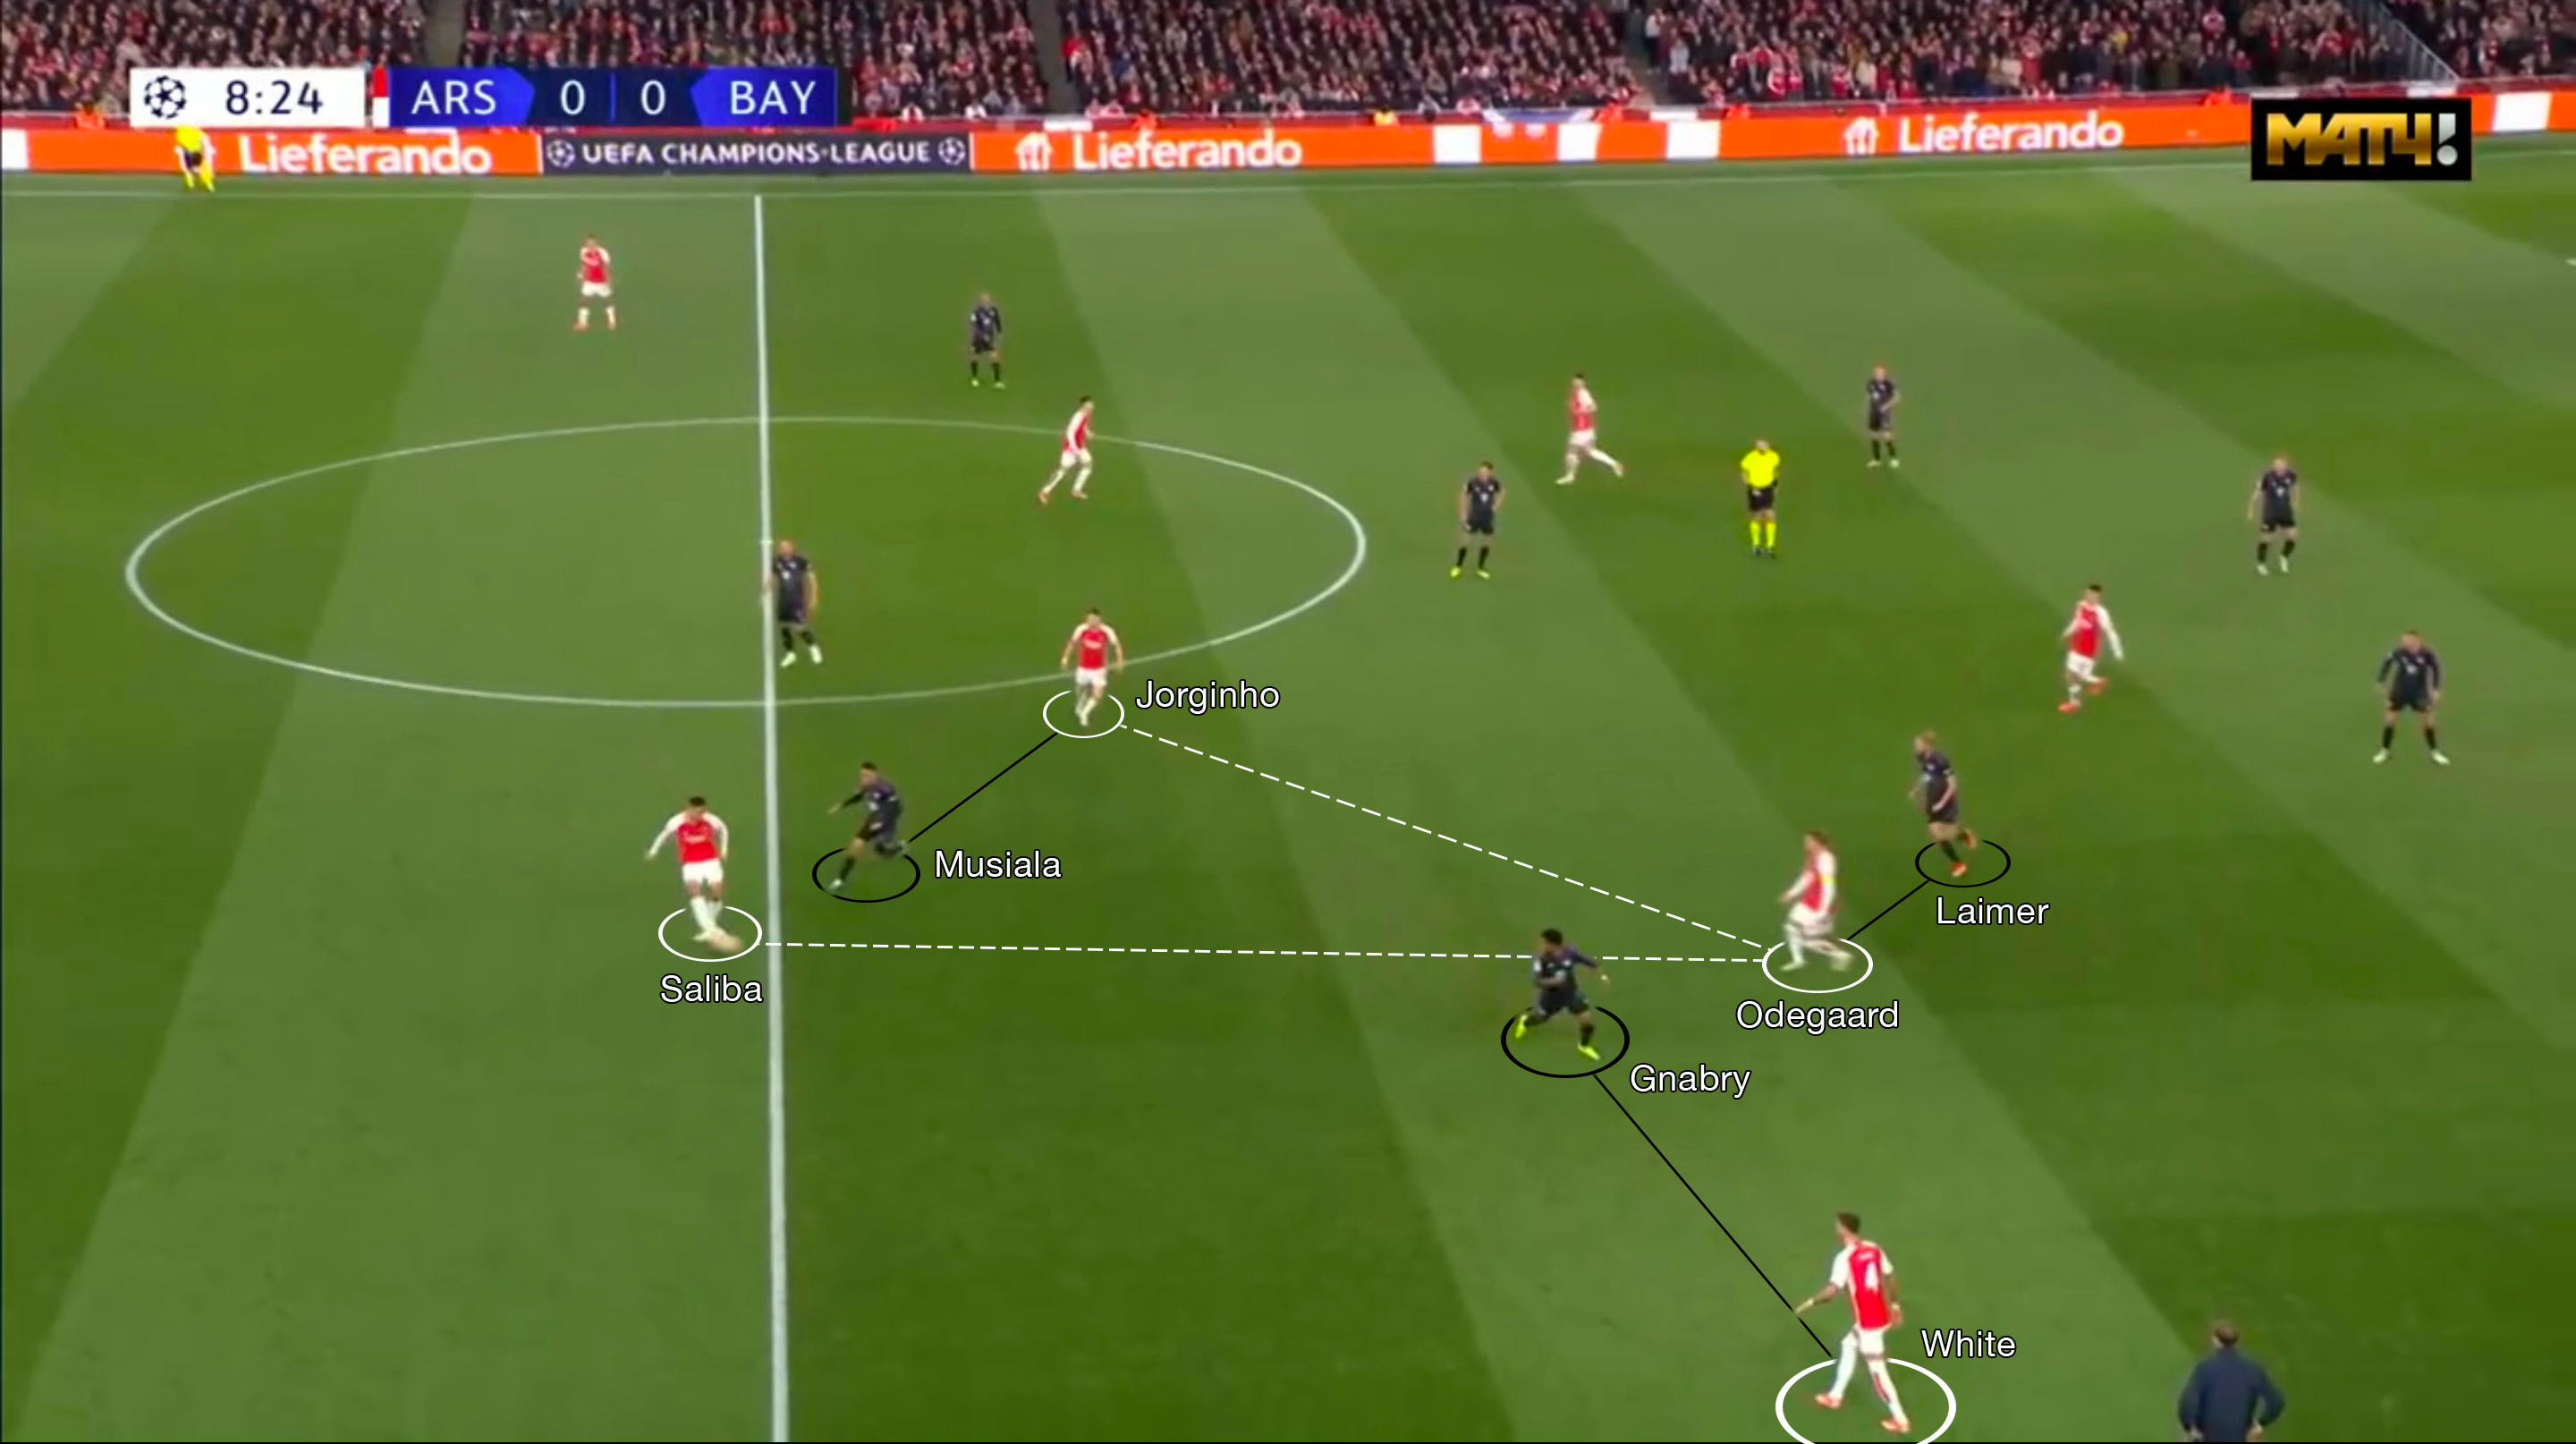
You can see at the start of this sequence how focused Musiala is on blocking Jorginho and how Laimer is, too, on Ødegaard with his sunken position.
White being in the 1st line also means Gnabry presses high up. Although a foul is won, there is no time for Saka to do anything, and any likely 1st-time passes inside are more than ready to be smothered by Laimer and Musiala anticipating such.
3rd example
No messing around here, either. It got Davies a booking but Bayern were suffocating the spaces extremely well. Even if Saka played back the way of Ødegaard, Musiala was already right on top of him.
On another note, what comes with feeling out the right solutions are those, sometimes deliberately, missed opportunities early on. This is an early instance where White’s positioning opened a space inside that Ødegaard was ready to exploit, and could potentially use to connect into a freed up, goal-facing Jorginho, but Saliba didn’t utilise/recognise this.
Ødegaard in at RB
4th example
This is a much longer passage of trial-and-error but is one that proved the most fruitful.
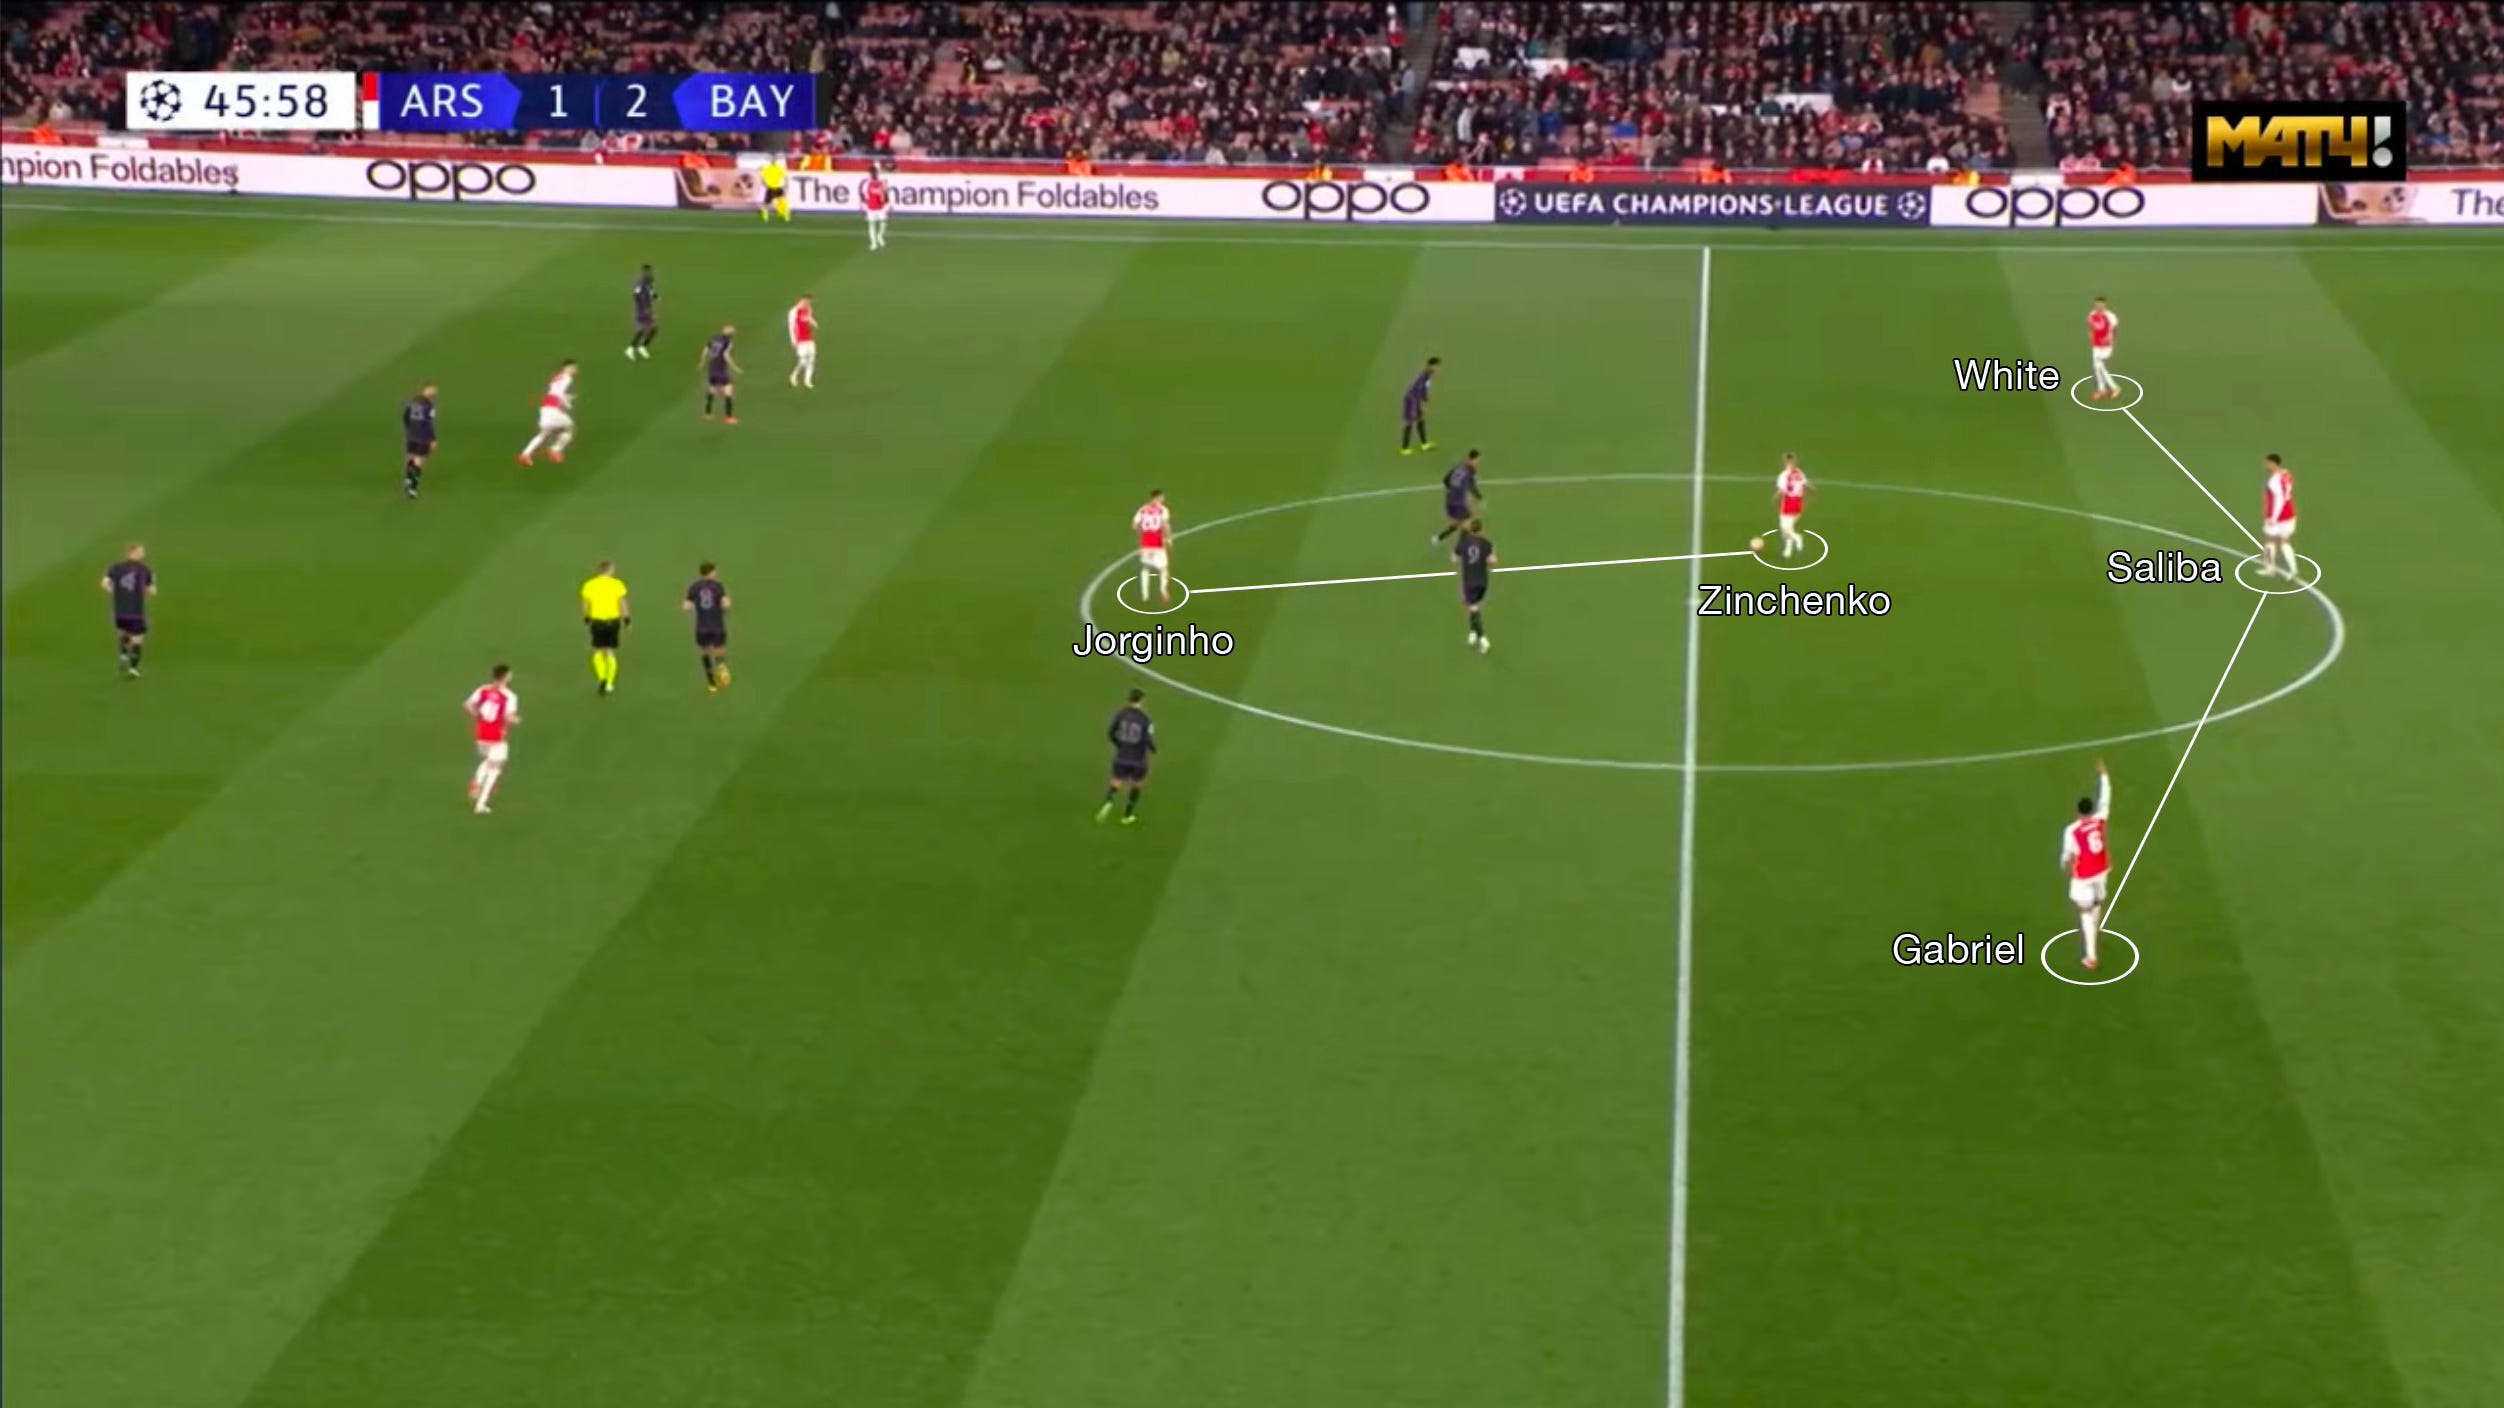
The key to this passage, and the majority of successful passages from Arsenal against blocks, is the reset. Ødegaard, who’s this time filling in that RB slot, goes back to the 1st line 3 times, and each is more productive than the last.
Particularly in the case of the 2nd instance, going back to Gabriel over Saliba is key because of the ground it forces Bayern to cover. They can’t think about stepping out to the ball, like they might in some cases when it’s passed flatly back to a closer CB, because they’re concerned now with shutting down spaces on the side they’re expecting to have to cover (the left side).
Now, as Ødegaard faints to move across too but instead dips out, he has infinitely more time and space in the same area.
What you could suggest hurts this move is the Norwegian’s struggles with the angles. Oftentimes, it has to be perfect for him to pull off the decisive pass, like the one that might’ve been on in behind for White’s out-to-in run.
However, like with the Saliba instance earlier, when you’re as patient and probing a side as Arsenal, who leave no leaf unturned, it can be more productive to not play to the run. This is evident in how the move continues to unfold because the patience to reset affords Ødegaard the perfect opportunity to control the ball from out-to-in, rather than carry it in-to-out.
This brief reset enables him to set the ball much further inwards without pressure, and to then hook the ball over perfectly to help exploit Bayern’s high line and the isolated duels that come from man-marking.
What makes this move really stick is Havertz’s presence. With Dier recovering to the middle, Havertz is the overloading presence at the 2nd ball, which then allows for White and Saka to exploit the space in the final third.
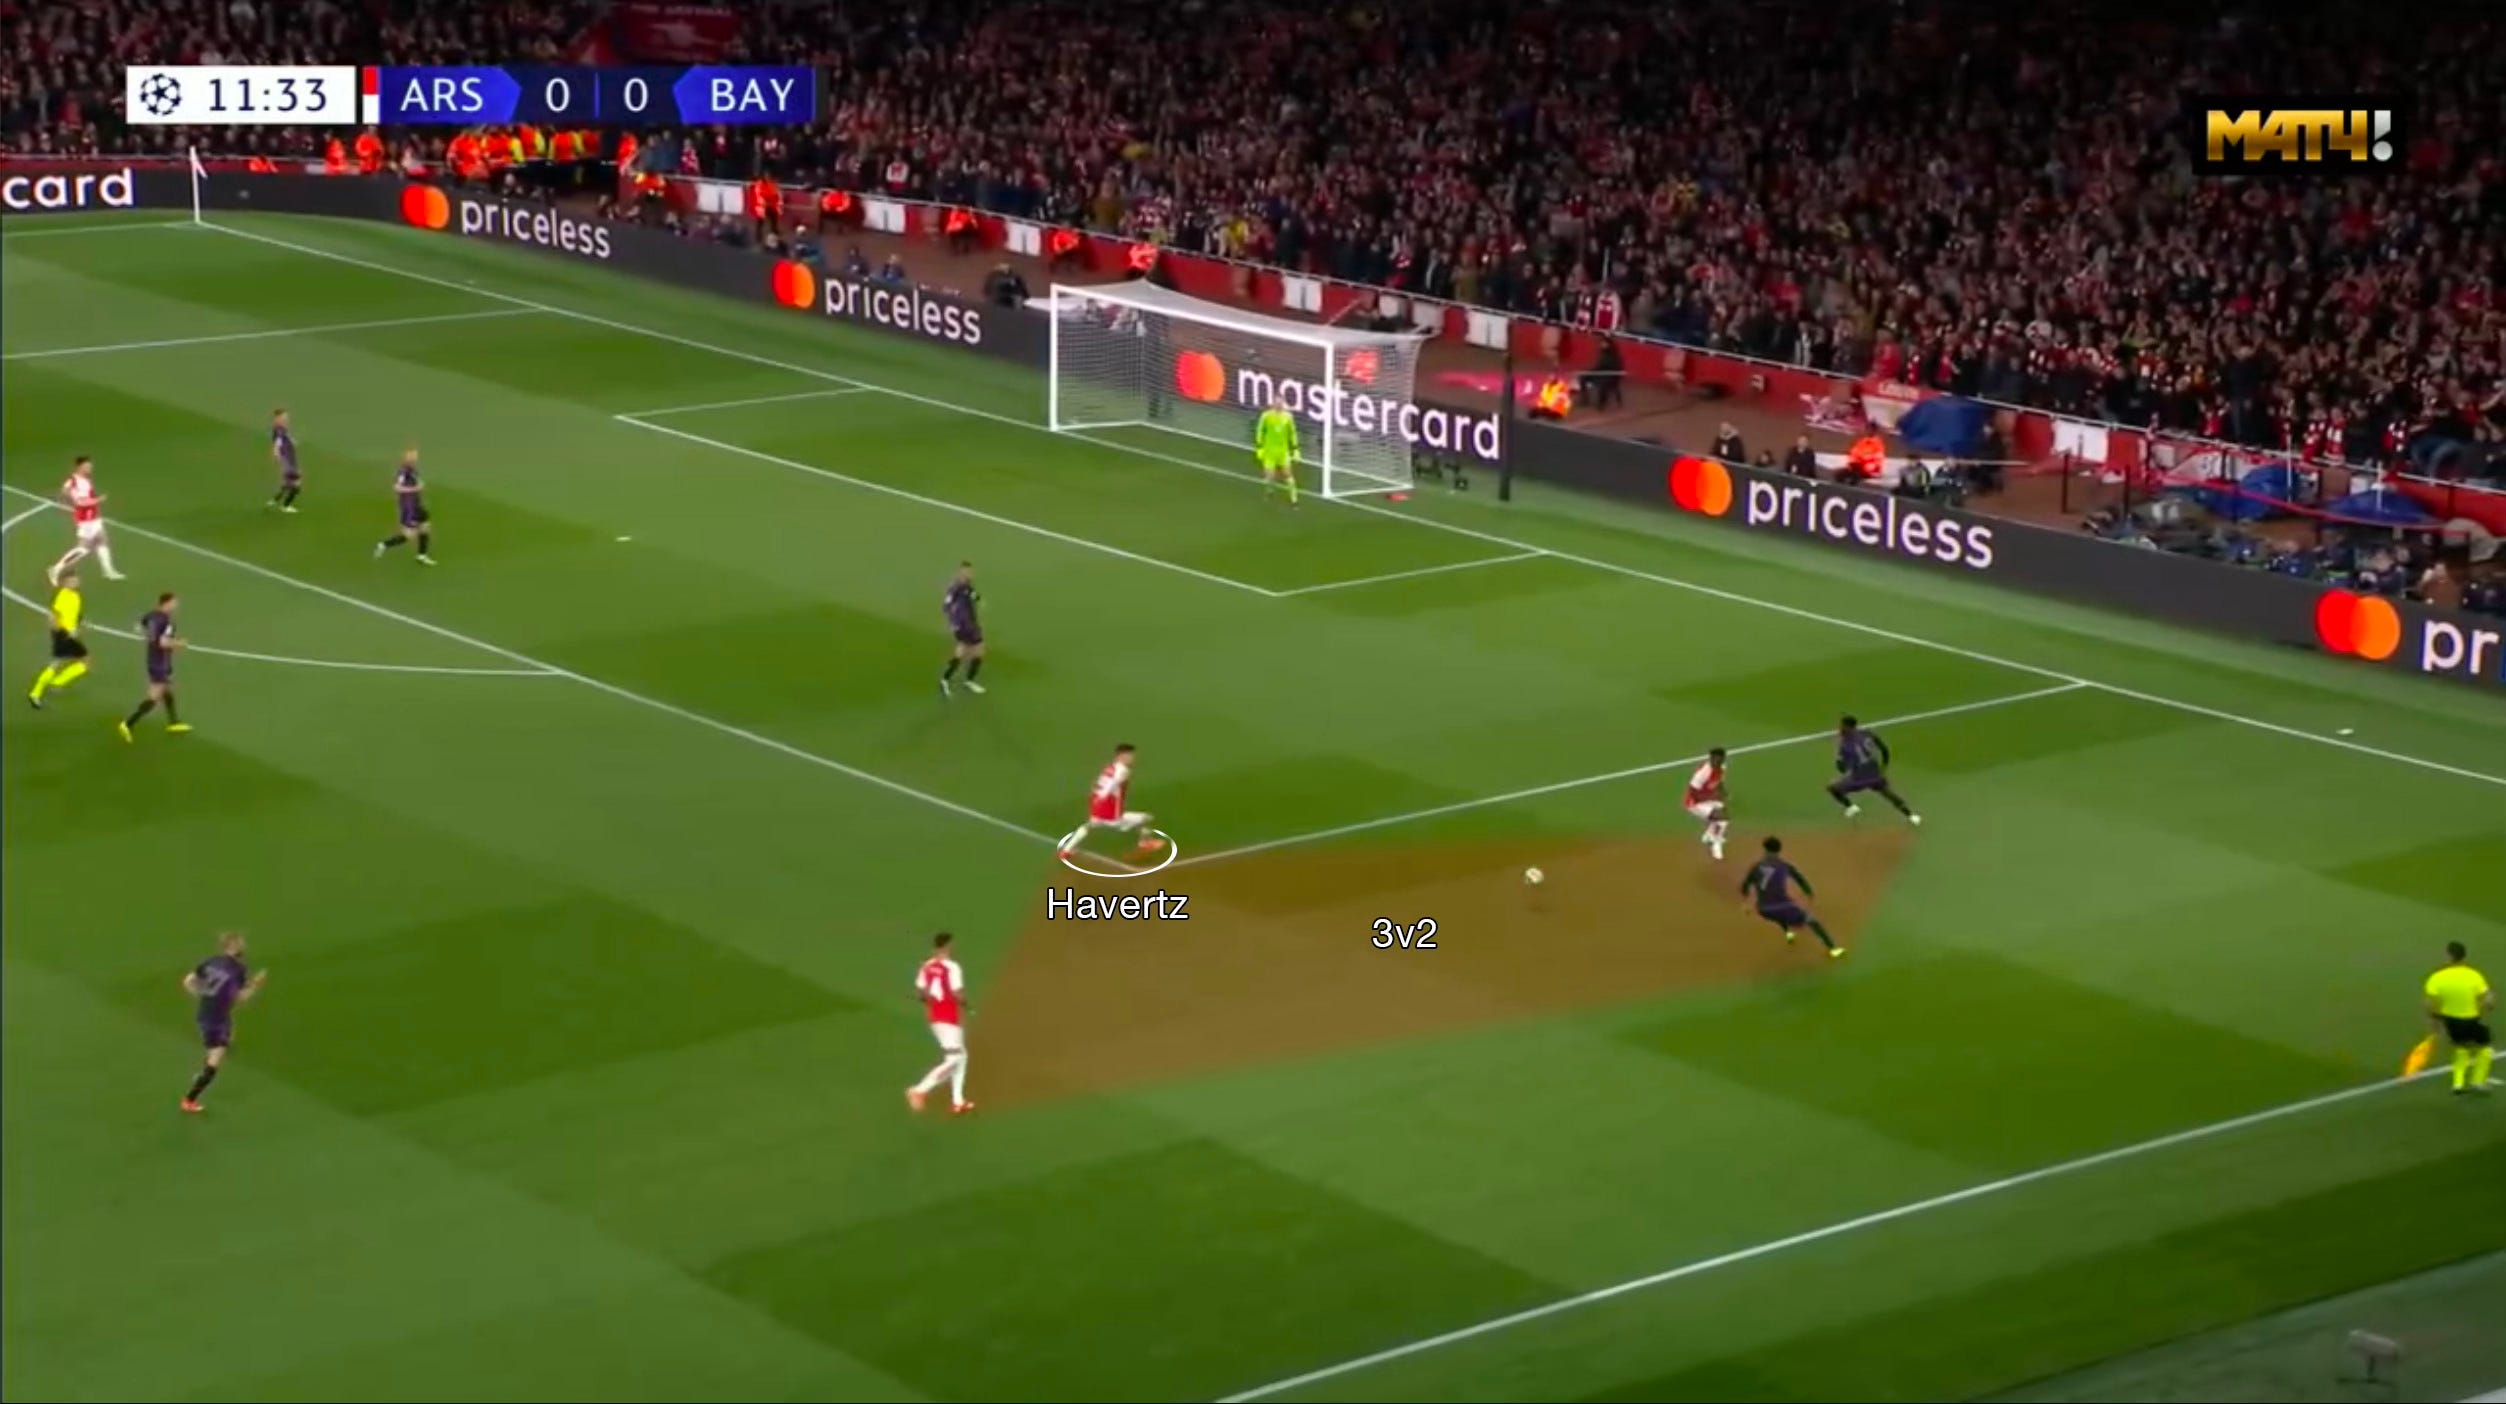
Just like that, all 4 right-sided players Bayern were desperate to snuff out combined for the opener.
5th example
In yet another successful move, patience is the key again. As much as Saliba’s short ball to Saka at the beginning is one that prevents the potential wall pass into Ødegaard’s underlap off the back of Musiala, the captain’s later refusal to play forwards in favour of resetting highlights why it’s a perfectly productive decision.
By then playing to the left, even in a redundant manner, it reopens the right side. The positioning of Saka and White, in place of Ødegaard, to maintain the structure is also key for manipulating the space left for Ødegaard to receive in.

This part of the move is a good example of why you play as far across as you can when going back. If Ødegaard had laid it back to Saliba whilst under pressure, there’s very little change in path needed for someone like Musiala to step out and instigate a press that would allow the opposition to direct the passes.

By bypassing the security player (Saliba), the same trick as earlier is achieved of making the central opponents recover laterally to reopen the space. With the players involved knowing that they’re going to play back against the grain, they’re quick to exploit the space that’s been reopened.
The result is that bit of time and space needed for Ødegaard to properly set the ball inwards so that he can curl it over the top for White’s run the best way he can. It may not find White exactly but it puts Gnabry in a difficult position as to where he should be heading this ball given Arsenal’s 2nd ball setup.

And, once again, Havertz steals the show. He’s not even across at the beginning of the move but he is the most alert to the possibility of the second ball, and that’s what capitalises on the open situation in the final third.

The finish is the one let-down, even for a fullback. It has to be hit with the laces and headed for the far corner, but he goes with the inside of the boot and makes a hash of a huge chance to move clear.
6th example
Progress slowed down from here, though.
A similar approach with Ødegaard dropping in led to access into Jorginho, for once, but it also illustrated how well-placed some of these short passes need to be to then withstand the collapsing pressure from the Bayern shape. Passing to feet, here, works if Jorginho has his first-time pass lined up already, but because he doesn’t, and he’s neither the most press-resistant ball-handler, he gets caught out by Musiala’s backwards press.
Havertz mops up and the circulation across shows the potential benefits of working the left side, purely on the basis that Bayern retreat deeper since they work more zonally on that side, and the front two work hard to squeeze the space in front.
This allows play to come across to the right with much more isolated duels in larger spaces and easier access and control of the final third. However, as would continue to plague the team for much of the night, the subtle miscues of simple passes, like Ødegaard’s to Saka, hampered moves that bore a lot of potential.

This leads to a tight situation out wide where Musiala working back denies Jorginho of his effective 4th man presence, whilst the man-marking manages to take away time from those on that side. For that reason, Ødegaard gets caught out a bit for squaring up to his man as he does, because the short passes need to be perfect to avoid the instant pressure he and his teammates are under. This wasn’t the case and Musiala clears.
The counter-pressure leading to the clearance should just be a reset, effectively, but Raya had other ideas.

The ‘keeper’s rush out is totally unnecessary and puts Gabriel under the sort of pressure he had no right being under. From there, it’s calamity after calamity, and just one of several defensive transition-based sequences where technical flaws and naiveties were exploited by Bayern’s quality up top.
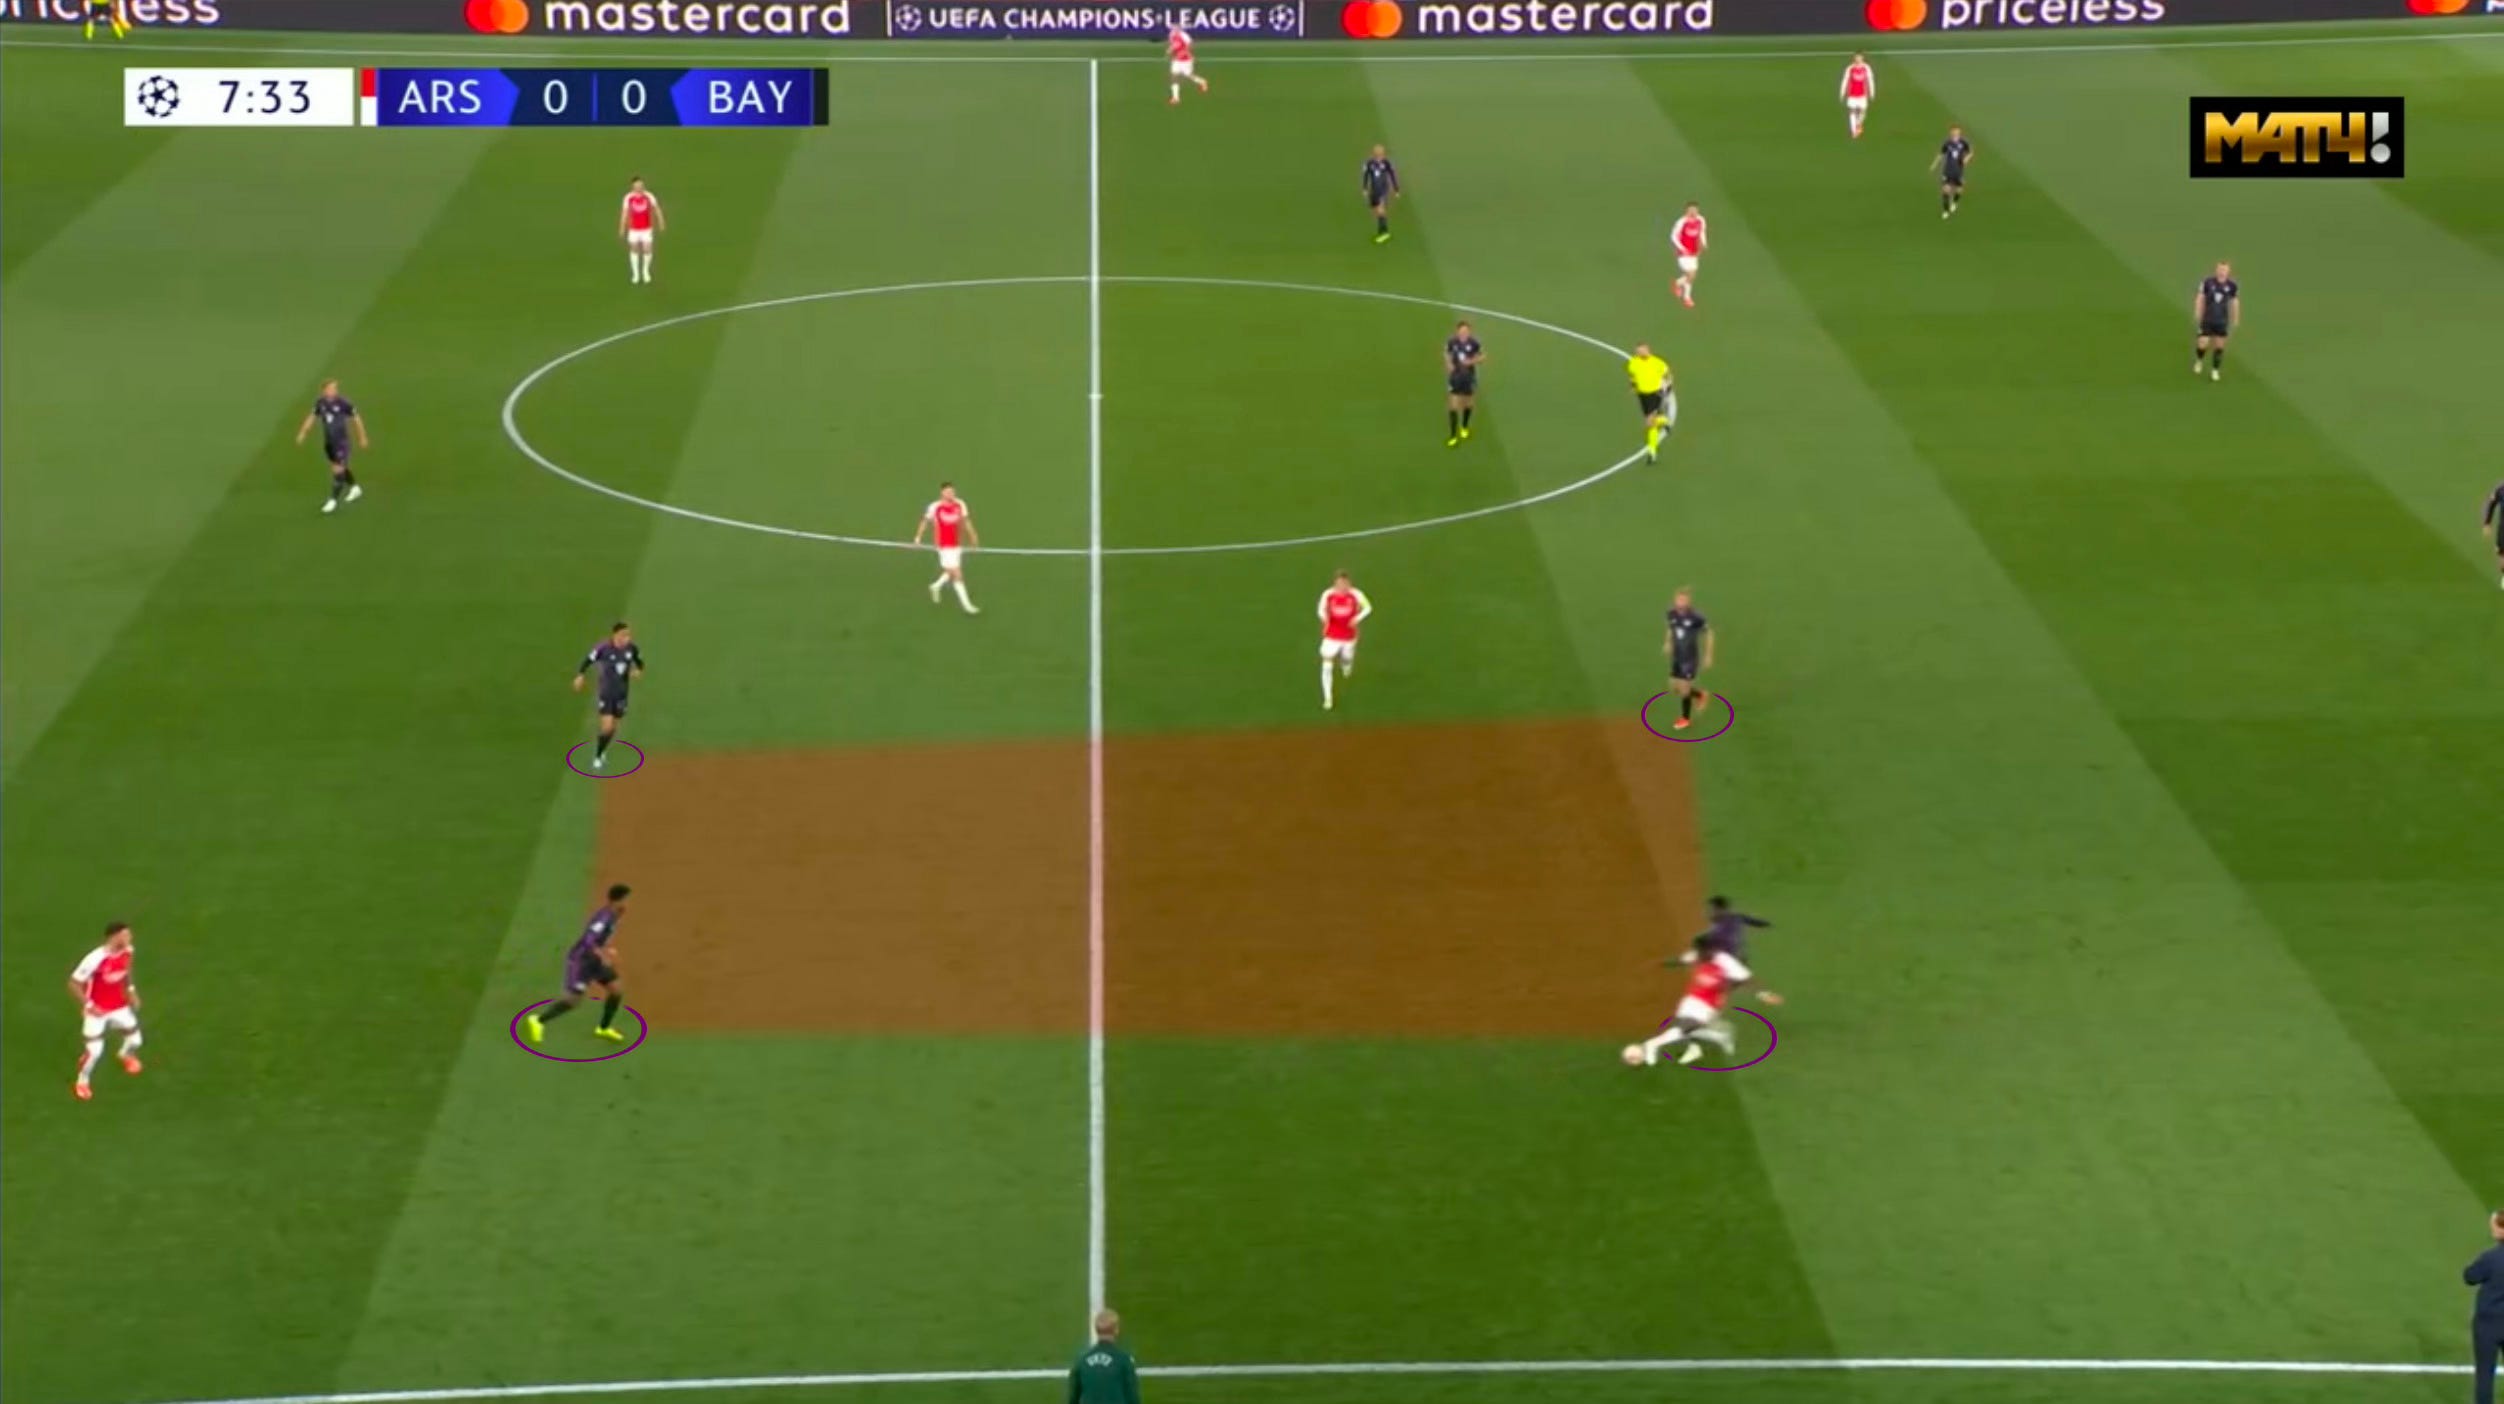
Sané, who terrorised his opponents just about every time he got on the ball, threaded an exquisite pass to Goretzka’s run from deep. Aiding that is Rice, who’s aware of Goretzka but stops scanning, so doesn’t foresee the trajectory of his run. Because of that, he also holds a narrow body stance and plants forwards as the ball’s released, making it impossible for him to change direction in time.

The awareness is also lacking slightly from Saliba afterwards. On Bayern’s end, the execution is flawless – the slide ball couldn’t have been weighted any better – but at no point does Saliba scan to see Gnabry’s run, so shapes to jockey as if Goretzka’s the last man and is waiting for him to pull the definitive trigger before committing.

In an ideal world, Saliba is aware of the run and commits across more to better block the lane and encourage Goretzka onto his weaker foot.
Saliba at the heart
Arsenal strayed from this approach after the equaliser, looking for a bit more balance to circulation, seemingly with the aim of stretching the space down the right more broadly. So, more energy was focused on gaining territory, and therefore control, over looking to exploit the same minor holes of Bayern’s high line.
Ødegaard, as a result, started to act more like a pawn looking to pin space for others. There was also added focus on flooding the left for the sake of stretching the right.
The big upside to Saliba being at the helm is that his take-ons, as a CB, carried an element of surprise, which is great for breaking down man-marking schemes and creating key overloads as the ball moves closer to the opposition’s defence. In addition to this, Musiala wanted to curve his pressing runs to shut off the reset ball back inside, so Saliba has leeway to carry forwards.
7th example
In this case, Saliba is patient and resets well to create a separation from Musiala. Ødegaard staying tucked in opens that halfspace, as do Saka’s, White’s & Havertz’s positions.
The one thing lacking here is that subtle execution again. The 2nd touch from Saka should be a return ball to Saliba, as Musiala didn’t expect him to continue his movement forwards and it creates a situational overload versus Davies, who is more aware of the Frenchman’s position. While Saka does earn a foul, it disrupts a potentially productive move.
8th example
After more left-sided retention, we see a bit more exploitation of the space left down the right. Ødegaard and White’s narrow positions expand the space out wide again, and Saliba’s small forwards carry exploits the angle of Musiala’s press.
It successfully gets Saka receiving on the cut-in with space to play across the face of Bayern’s midfield for once. Unfortunately, Martinelli, despite scanning that way prior to receiving, pushes forwards not expecting Sané to work back as hard as he did.
9th example
Here, the midfield effectively shifts a line deeper. Ødegaard and Rice are in a double pivot and Jorginho’s at CCB to cover for Saliba’s small ball carry, which is what draws Musiala across and allows for smooth circulation across to Rice.
Again, the left side isn’t being tracked man-for-man, so Rice has ample time and space to field a great diagonal into Saka’s run. The winger’s perhaps a little tentative when going about controlling it versus Gnabry, hence why he was beaten to the punch, but the resulting corner delivery almost paid dividends as Bayern survived a scramble in the 6-yard box.
10th example
In another case of the midfield trio dropping deeper, Ødegaard and Rice act as inverted FBs, here. We see Rice exploit more of that time and space in the LB pocket that goes comparatively un-pressured, which is something that Arteta later adapts to. But, for now, the reset through circulation across the back and positioning ahead from White and Saka reopen and pin the space for Ødegaard.
However, it’s once again that missing execution of a simple move that disrupts the flow of possession. Ødegaard is deliberate in his heavy touch wide because he’s expecting Saka to make the inside move in exchange and take the ball in his stride on the cut-in, as he so often does, but his small delay allows Laimer to kill the space and force a turnover.

11th example
Arsenal repeat the tighter left-sided circulation to open the right again, albeit the return to the right initially is a textbook example of why you omit so many short passes. The pass to Saliba buys Laimer time to step out, leading to a slight miscue of a short pass, and the forced return to him over Gabriel makes it easy for Musiala to also press out.
However, the reset after the forced reset, with Gabriel shaping towards the left only to then play back to Saliba, this time creates better space as Ødegaard pushes back inwards and Saka drops deep and wide.
This is a prime example of the potential upsides to the CB carries from deep. Musiala is caught on his heels chasing down this run through the pinned halfspace corridor. What’s missing is just the choice of movement to aid the release.
Ødegaard should be holding deeper here, be it via a double movement to throw Laimer off or in a way that pries Laimer out, because he’s currently congesting that central lane, making Havertz inaccessible at the same time.
White, on the other side, has to be making the out-to-in run because Davies is the player caught between a rock and a hard place due to Saliba’s dribble that engages him – he is the overloaded opponent, and his reluctance to drop back leaves a space behind him that can be exploited but isn’t.
These subtle miscues in movement and passing execution – likely the product of nerves on a big occasion – were the bane of Arsenal’s otherwise very poised and patient approach to breaking down the Bayern block.
Arsenal’s press
Arteta was much more keen on pressing from the front, and in doing so looked to lay a trap.
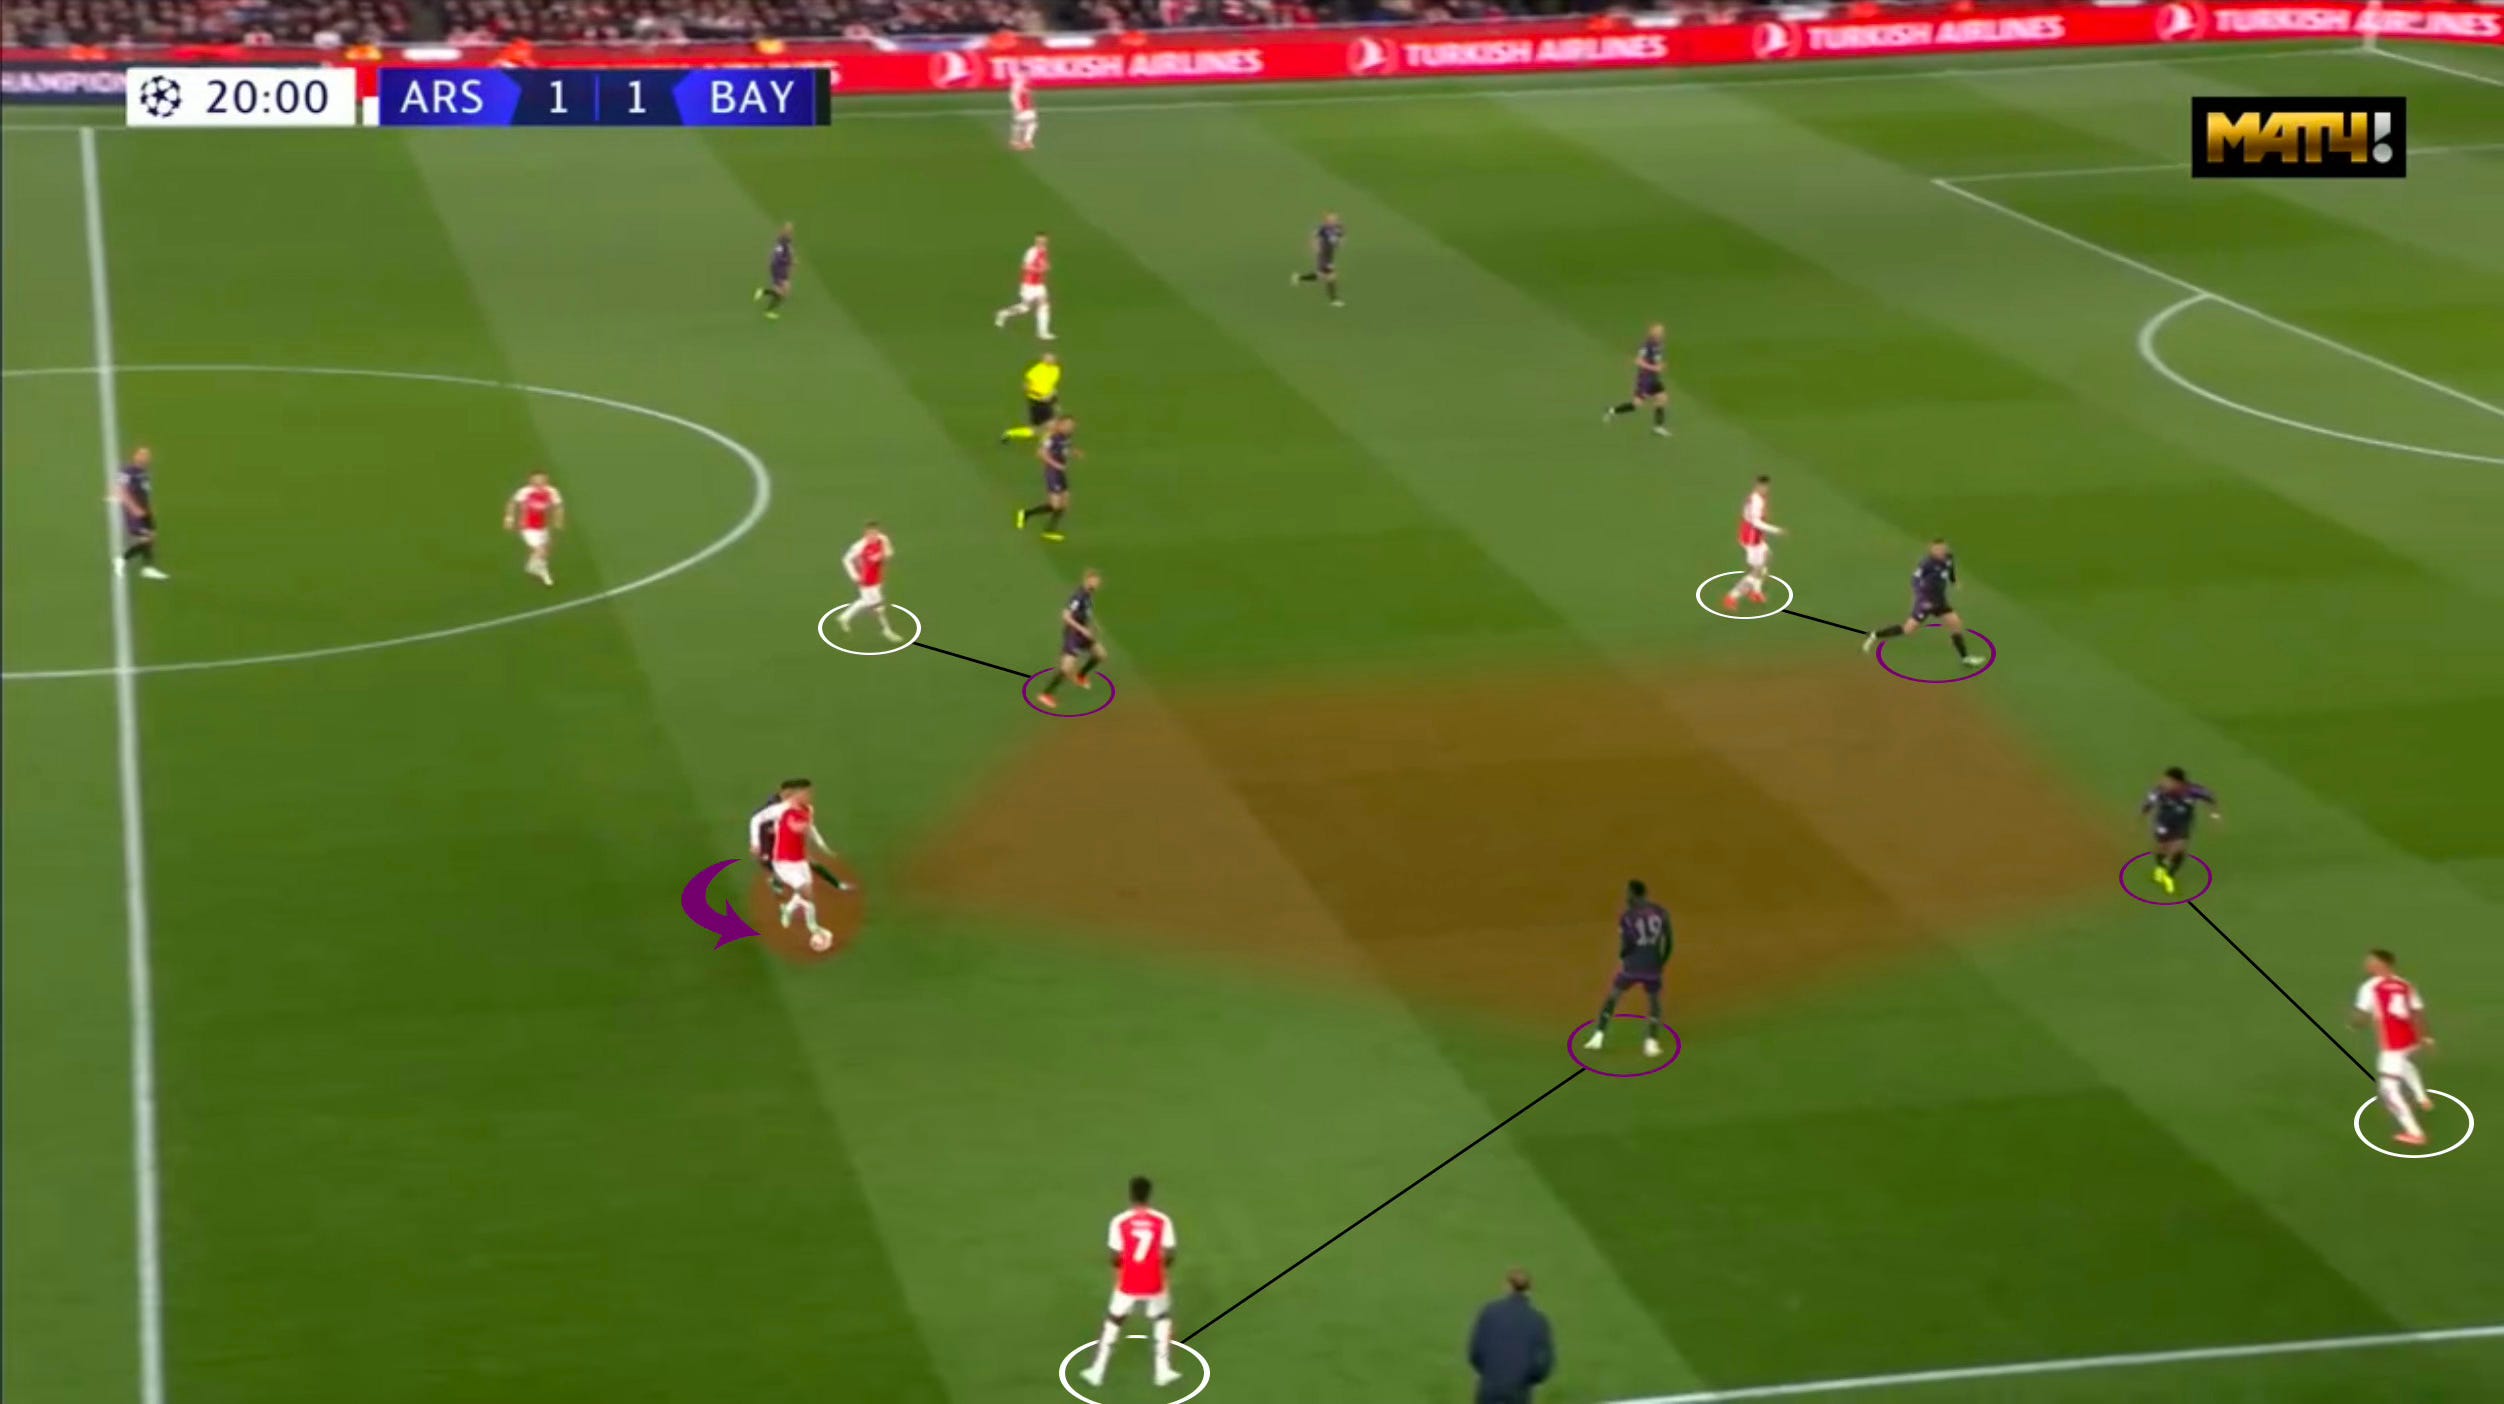
The typical approach saw Havertz steadily curve from de Ligt up to Neuer, whilst Ødegaard and Rice held tight against Laimer. Havertz’s coverage and Martinelli tucking inside away from Kimmich as play tightened for Neuer on the ball meant Rice could afford to step up without being exposed to the man he left.
The aim was to direct Bayern’s buildup to the left, where Dier, in particular, was far less equipped to handle the pressure.
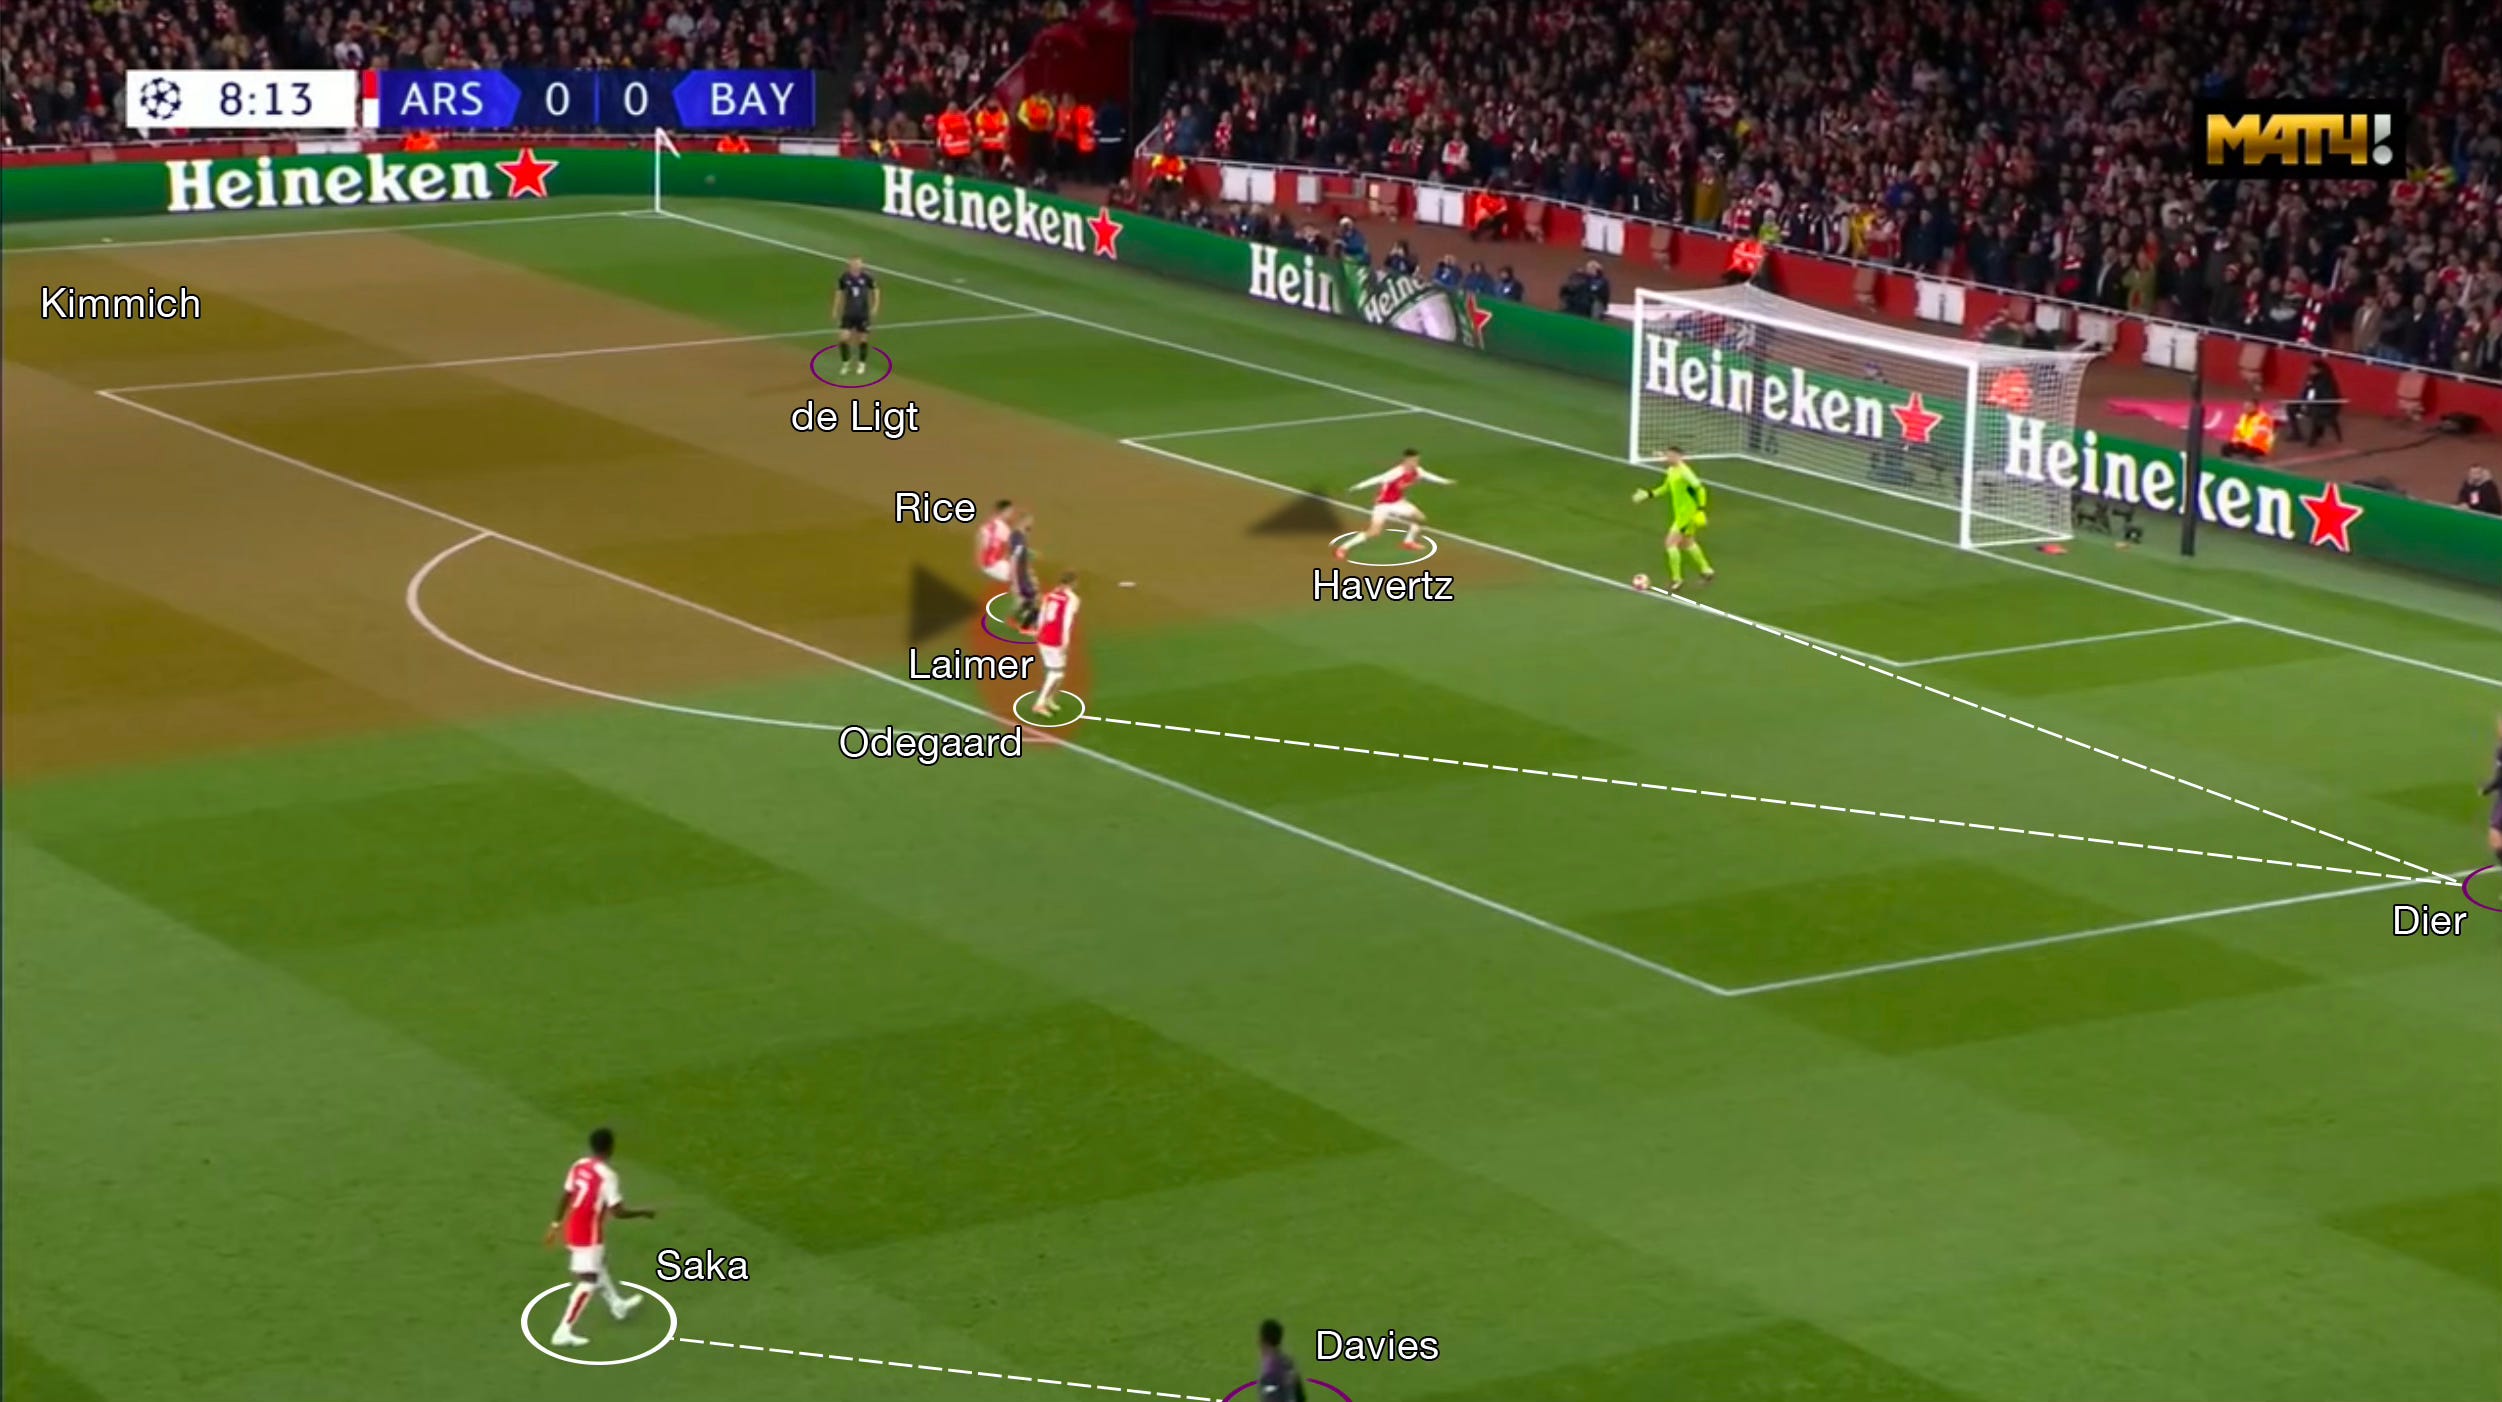
1st example
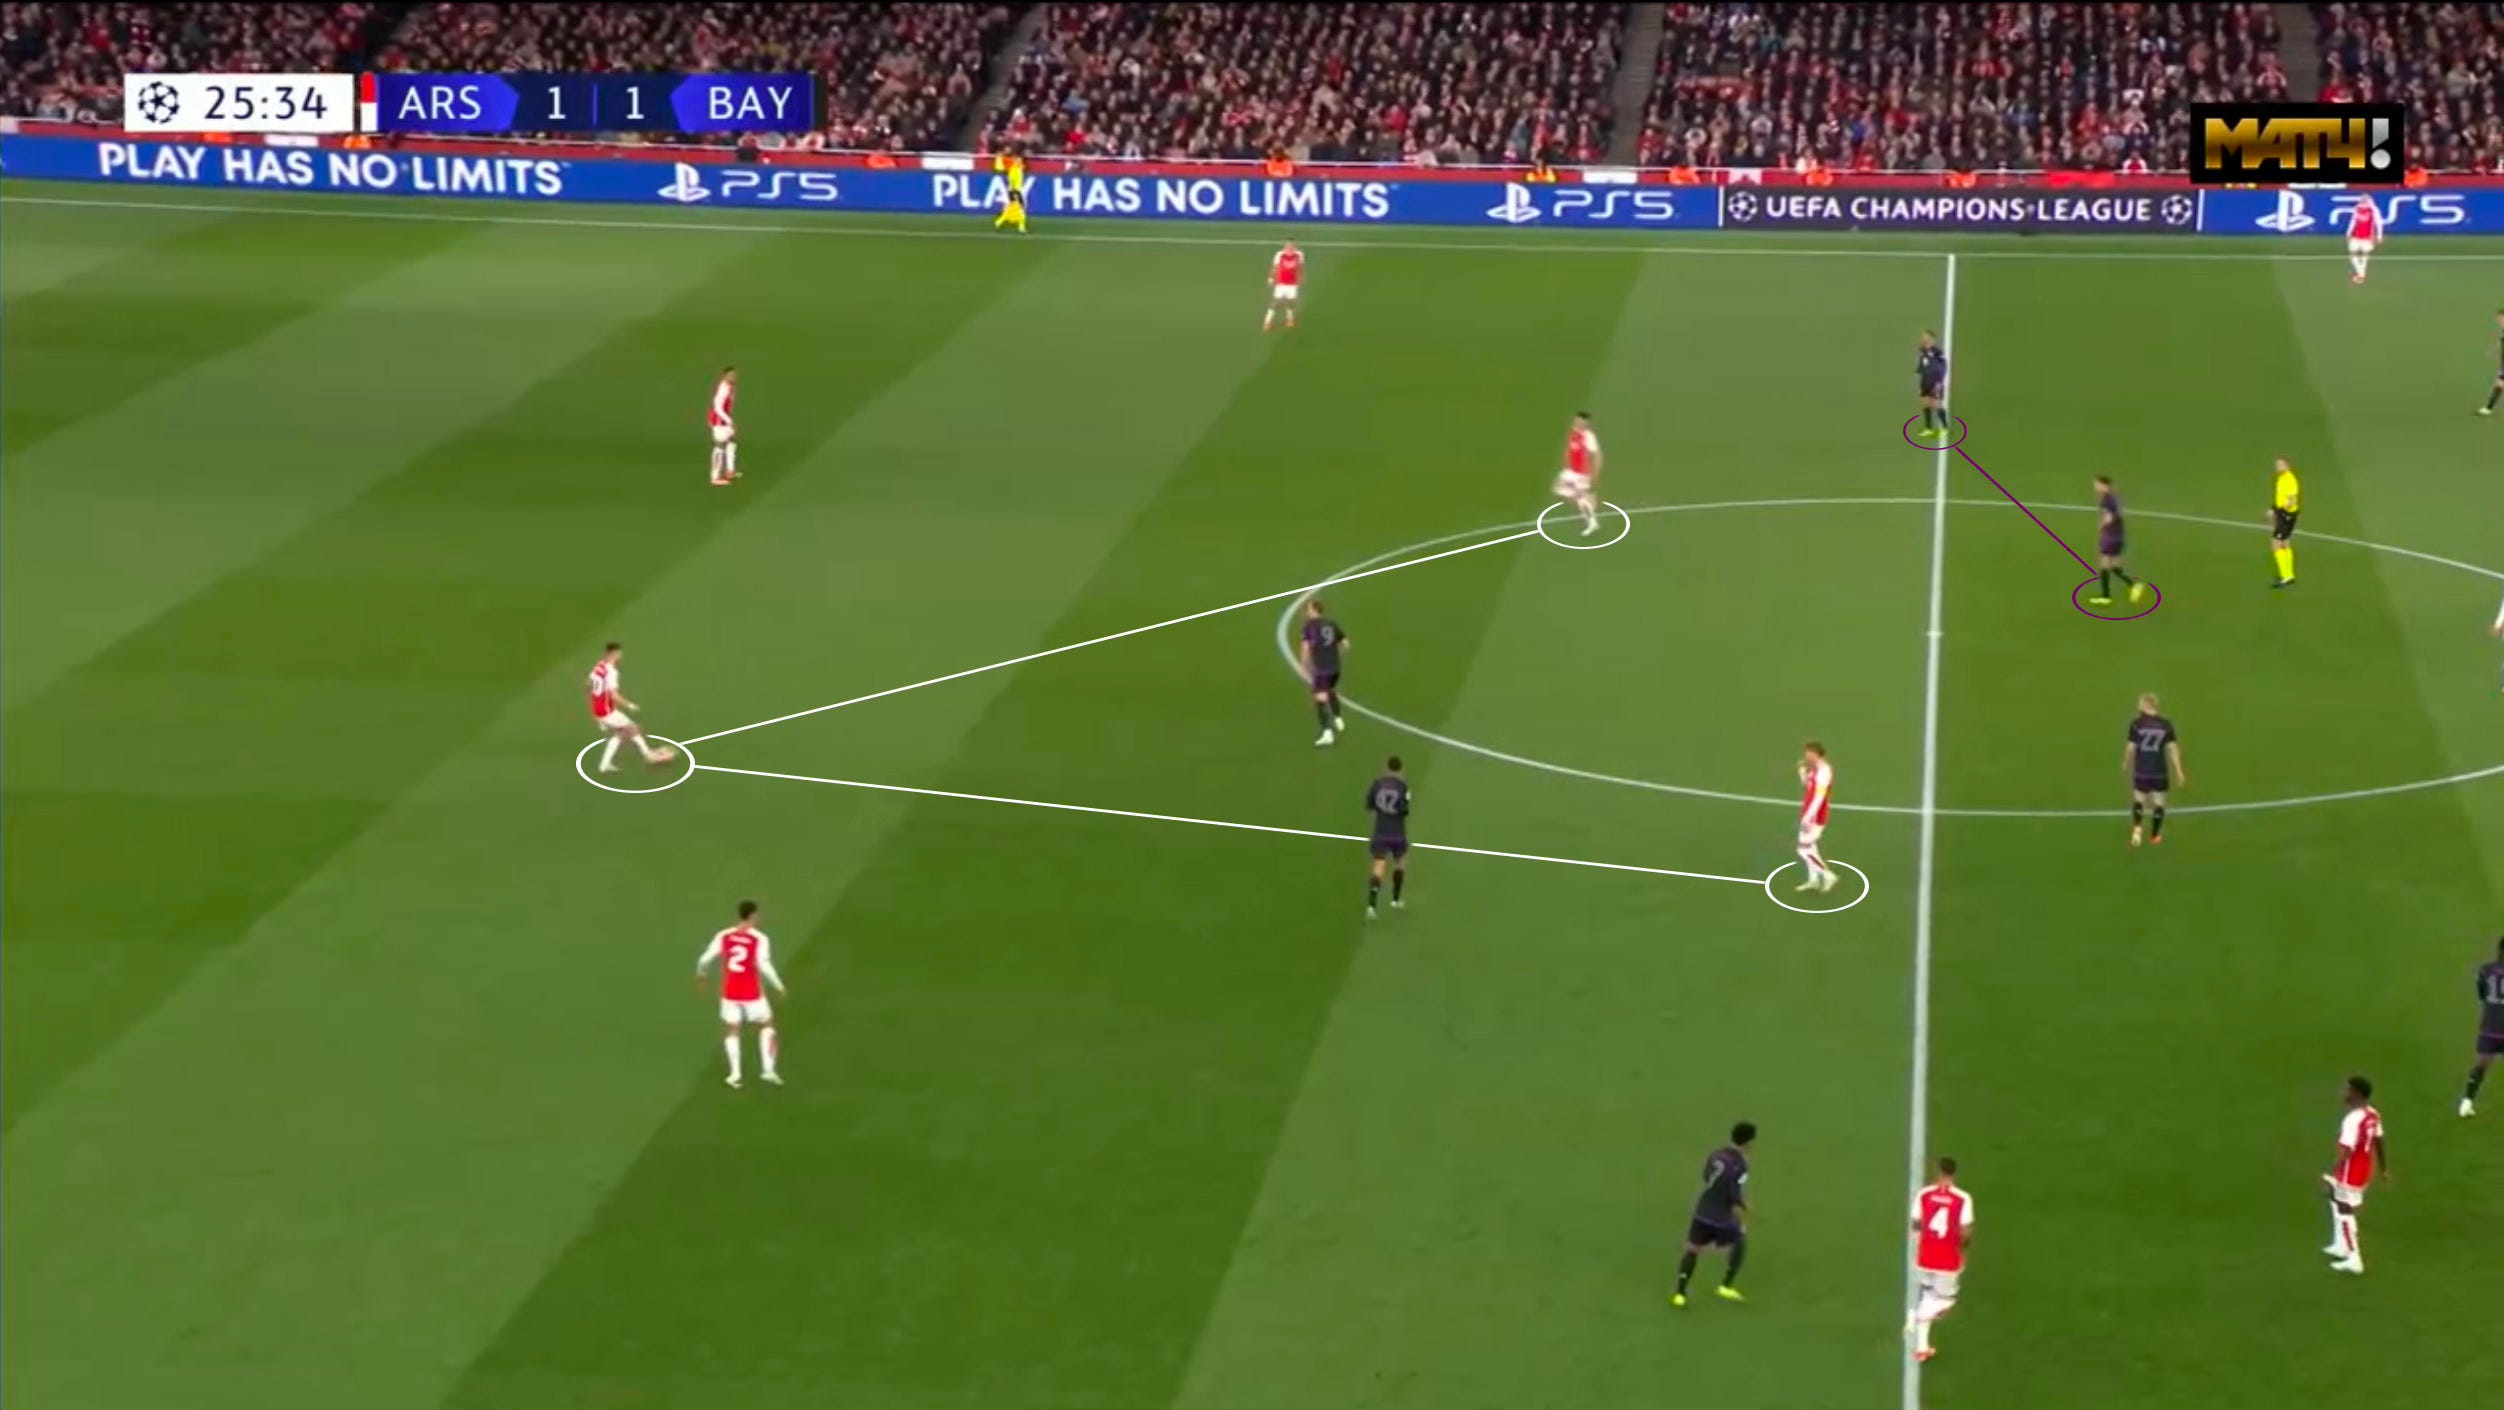
In this early instance, Rice is aggressive up to Laimer to prevent the wall pass around Havertz, while Havertz encroaches to force Neuer’s hand and Ødegaard holds inside to invite the pass to Dier.
With very little time to get the pass off, the hopeful ball up the pitch was handily dealt with and possession was restored.
2nd example
In this scenario, Arsenal go about it the same way but the added time gives Dier the opportunity to pick out Kane. With Musiala dropping short as a left-sided #8 but being ahead of the play unfolding, he used this position to spin Jorginho and be the option deep for the 2nd ball.
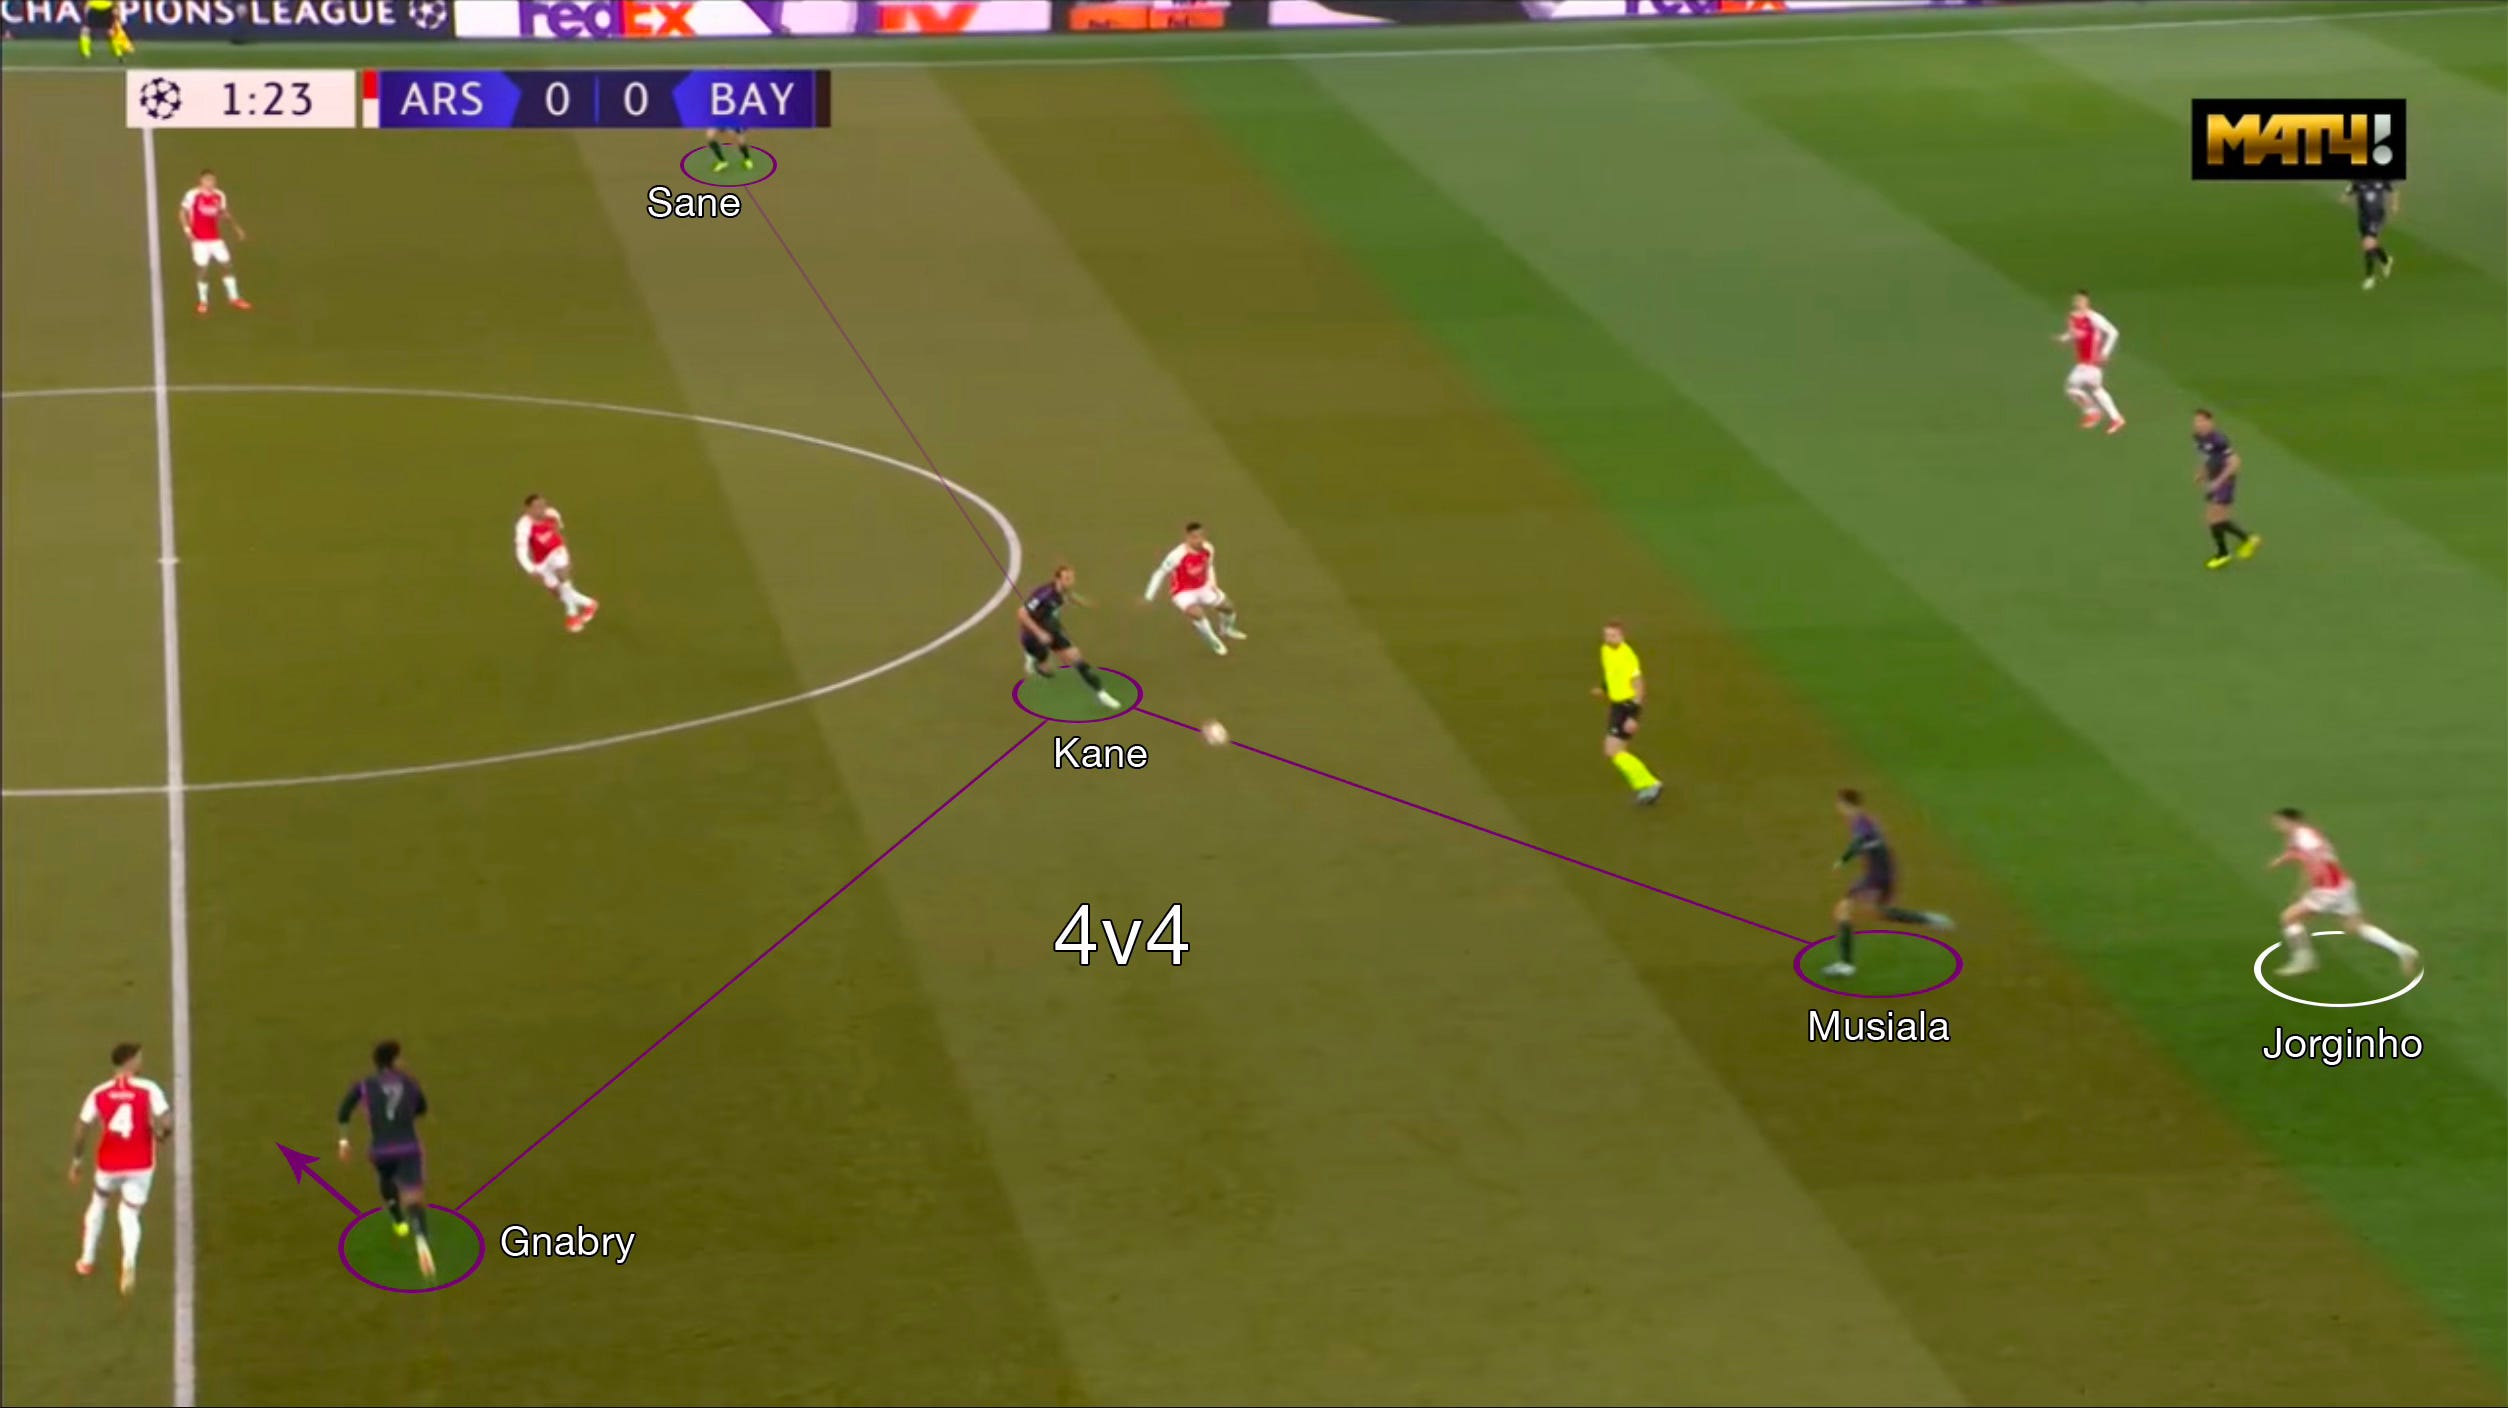
Although the layoff route wasn’t typically successful as Arsenal managed Kane well and smothered the 2nd balls, the timing of Gnabry’s inside run and Sané’s width-bearing on the far side still helped pinned the space between the lines.
When Bayern managed to get their attackers on the ball in these areas, they were usually very good at evading pressure and establishing some control further up the pitch. They were often happy to carry the ball wider in these phases, too, which bought them the time to get up the pitch if that was the best option.
That much was only cemented by the shift to a 4-3-3, with Laimer, Kane and Musiala continuing to poke holes in the lack of horizontal compactness on show from Arsenal’s deep block on the night.
3rd example
Arsenal’s most successful attempt came quite early on. Another small aspect to the press that’s important to note is Saka’s similar role to Ødegaard, as he also withheld his press on Davies with the intent of inviting the short ball. The space afforded to Davies made it seem as though Dier had margins to work with, but this was not the case as Saka proved in his interception of the slightly relaxed pass.

Although Bayern recovered well, here, it wasn’t the first Arsenal move that left a little more to be desired. Havertz’s loose touch saw him overwhelmed by the double pivot’s pressure, meaning he missed half a chance to slide in Saka’s run to the byline, but the end effort was still well worked.

It may look like a difficult pass to thread from this position but it’s a very common move that is executed in Arsenal counters, and one that you’d entrust someone more like Jesus to pull off than Havertz.
Seeking out Sané
Sané access was limited as much as possible, per the Arsenal press, and it was understandable given how much of a nightmare he was to deal with whenever he got on the ball. On multiple occasions, he received or picked up the ball from the right and waltzed inside, effortlessly gliding past every player that dared to challenge him.
Whenever Kimmich or de Ligt afforded themselves a moment to play forwards, they instantly sought out Sané to feet. In this example below, it comes via a wall pass into Goretzka because Rice – who was pretty lethargic in his defensive coverage all match – failed to get close.
The value of getting it into Sané’s feet so directly and early in a deep buildup move was that they could be 4v4 up top, like in the 2nd ball scenario displayed earlier from the left, and look to then exploit the space in front of the defence and behind the pressed-up midfielders.
Kiwior had huge struggles applying successful pressure to Sané from behind. In this instance, Sané’s faint to take it on the outside only to control it inside creates an easy separation, not least because of the fullback’s technical approach.
He leads with a very narrow body shape and by doing so means his changes of direction take longer to execute. So, when he goes to cover the outside control and plants his right leg across, it’s so difficult for him to shift directions in response to Sané’s inside control. He effectively has to run around where he just planted, rather than shift in time like he could’ve done had he spread his body and angled himself more.
Goretzka’s continued run pins that space inside and both Kiwior and Rice are stuck between a rock and a hard place in covering against the pair. They’re let off by the fact Sané undercooked his reverse ball return.
However, we see how truly devastating Sané can be minutes later.
Thanks to some quite amazing improvisation from Neuer to bypass Kai’s cover shadow, the right side of the defence get all of the time they need, which isn’t much at all, but de Ligt needs no 2nd invitations to fire it up the line into Sané’s feet.
Here we see a similar issue on Kiwior’s end when handling Sané. Once again, his body is too ball/forward-facing. Particularly in these close tussles, it’s important to angle yourself at least diagonally on to give yourself greater balance, leverage and also control for when it comes to trying to react and intervene.
By pressing onto Sané this way, not only does he restrict his reach to the ball, whether it stays in front or runs through as it does, but it also makes it so tough to shift in the opposite direction, which leads to him having to shirt tug just to keep up with Sané’s impeccable flick control through his legs.
After tearing away, it becomes a bit of a nightmare to watch unfold. There’s possibly some naivety involved in failing to prevent Sané’s run full stop before he makes it into the box. Jorginho and Gabriel’s missed challenges are a little more forgivable due to Kane’s run and Sané’s immaculate weight of touch on the cut-in, but Saliba is, again, at fault on a technical basis.
Based on his position and how he moves to angle his body’s direction, Saliba’s clearly anticipating that Sané’s run won’t manage to get on the inside of him. When it does, that’s when his very narrow and tall silhouette – not unlike Kiwior’s – gets exposed.
By having his feet so close together, as opposed to him lowering his centre of gravity by spreading his legs further apart on the same angle, he’s so late reacting to what’s happened. If he possessed a wider base, he’d have a good chance of making a more subtle lateral shift to his left where his left foot could potentially to intercept the run instead, and certainly attempt to do so much more cleanly. But, because he plants his feet narrowly facing outwards, he has to do so much to reach that space, ending up doing a full 180º in order to get his right foot across.
That is what gives Bayern their penalty to then go 2-1 ahead.
Technical flaws like this from Saliba, and these aspects regarding others in the team, aren’t news, they’re just typically incredibly well-disguised by the system, so it doesn’t often cost the team. It’s only in the biggest matches where games become that bit more stretched, the pressure’s higher, and the level of individual quality from the opponent is there all to expose these sometimes game-defining wrinkles.
2nd half
The Zinchenko change
Arteta swapped Kiwior out for the Ukrainian at half time in the hope of attacking the left side with more intent, as opposed to using it as a prop for opening space on the right.
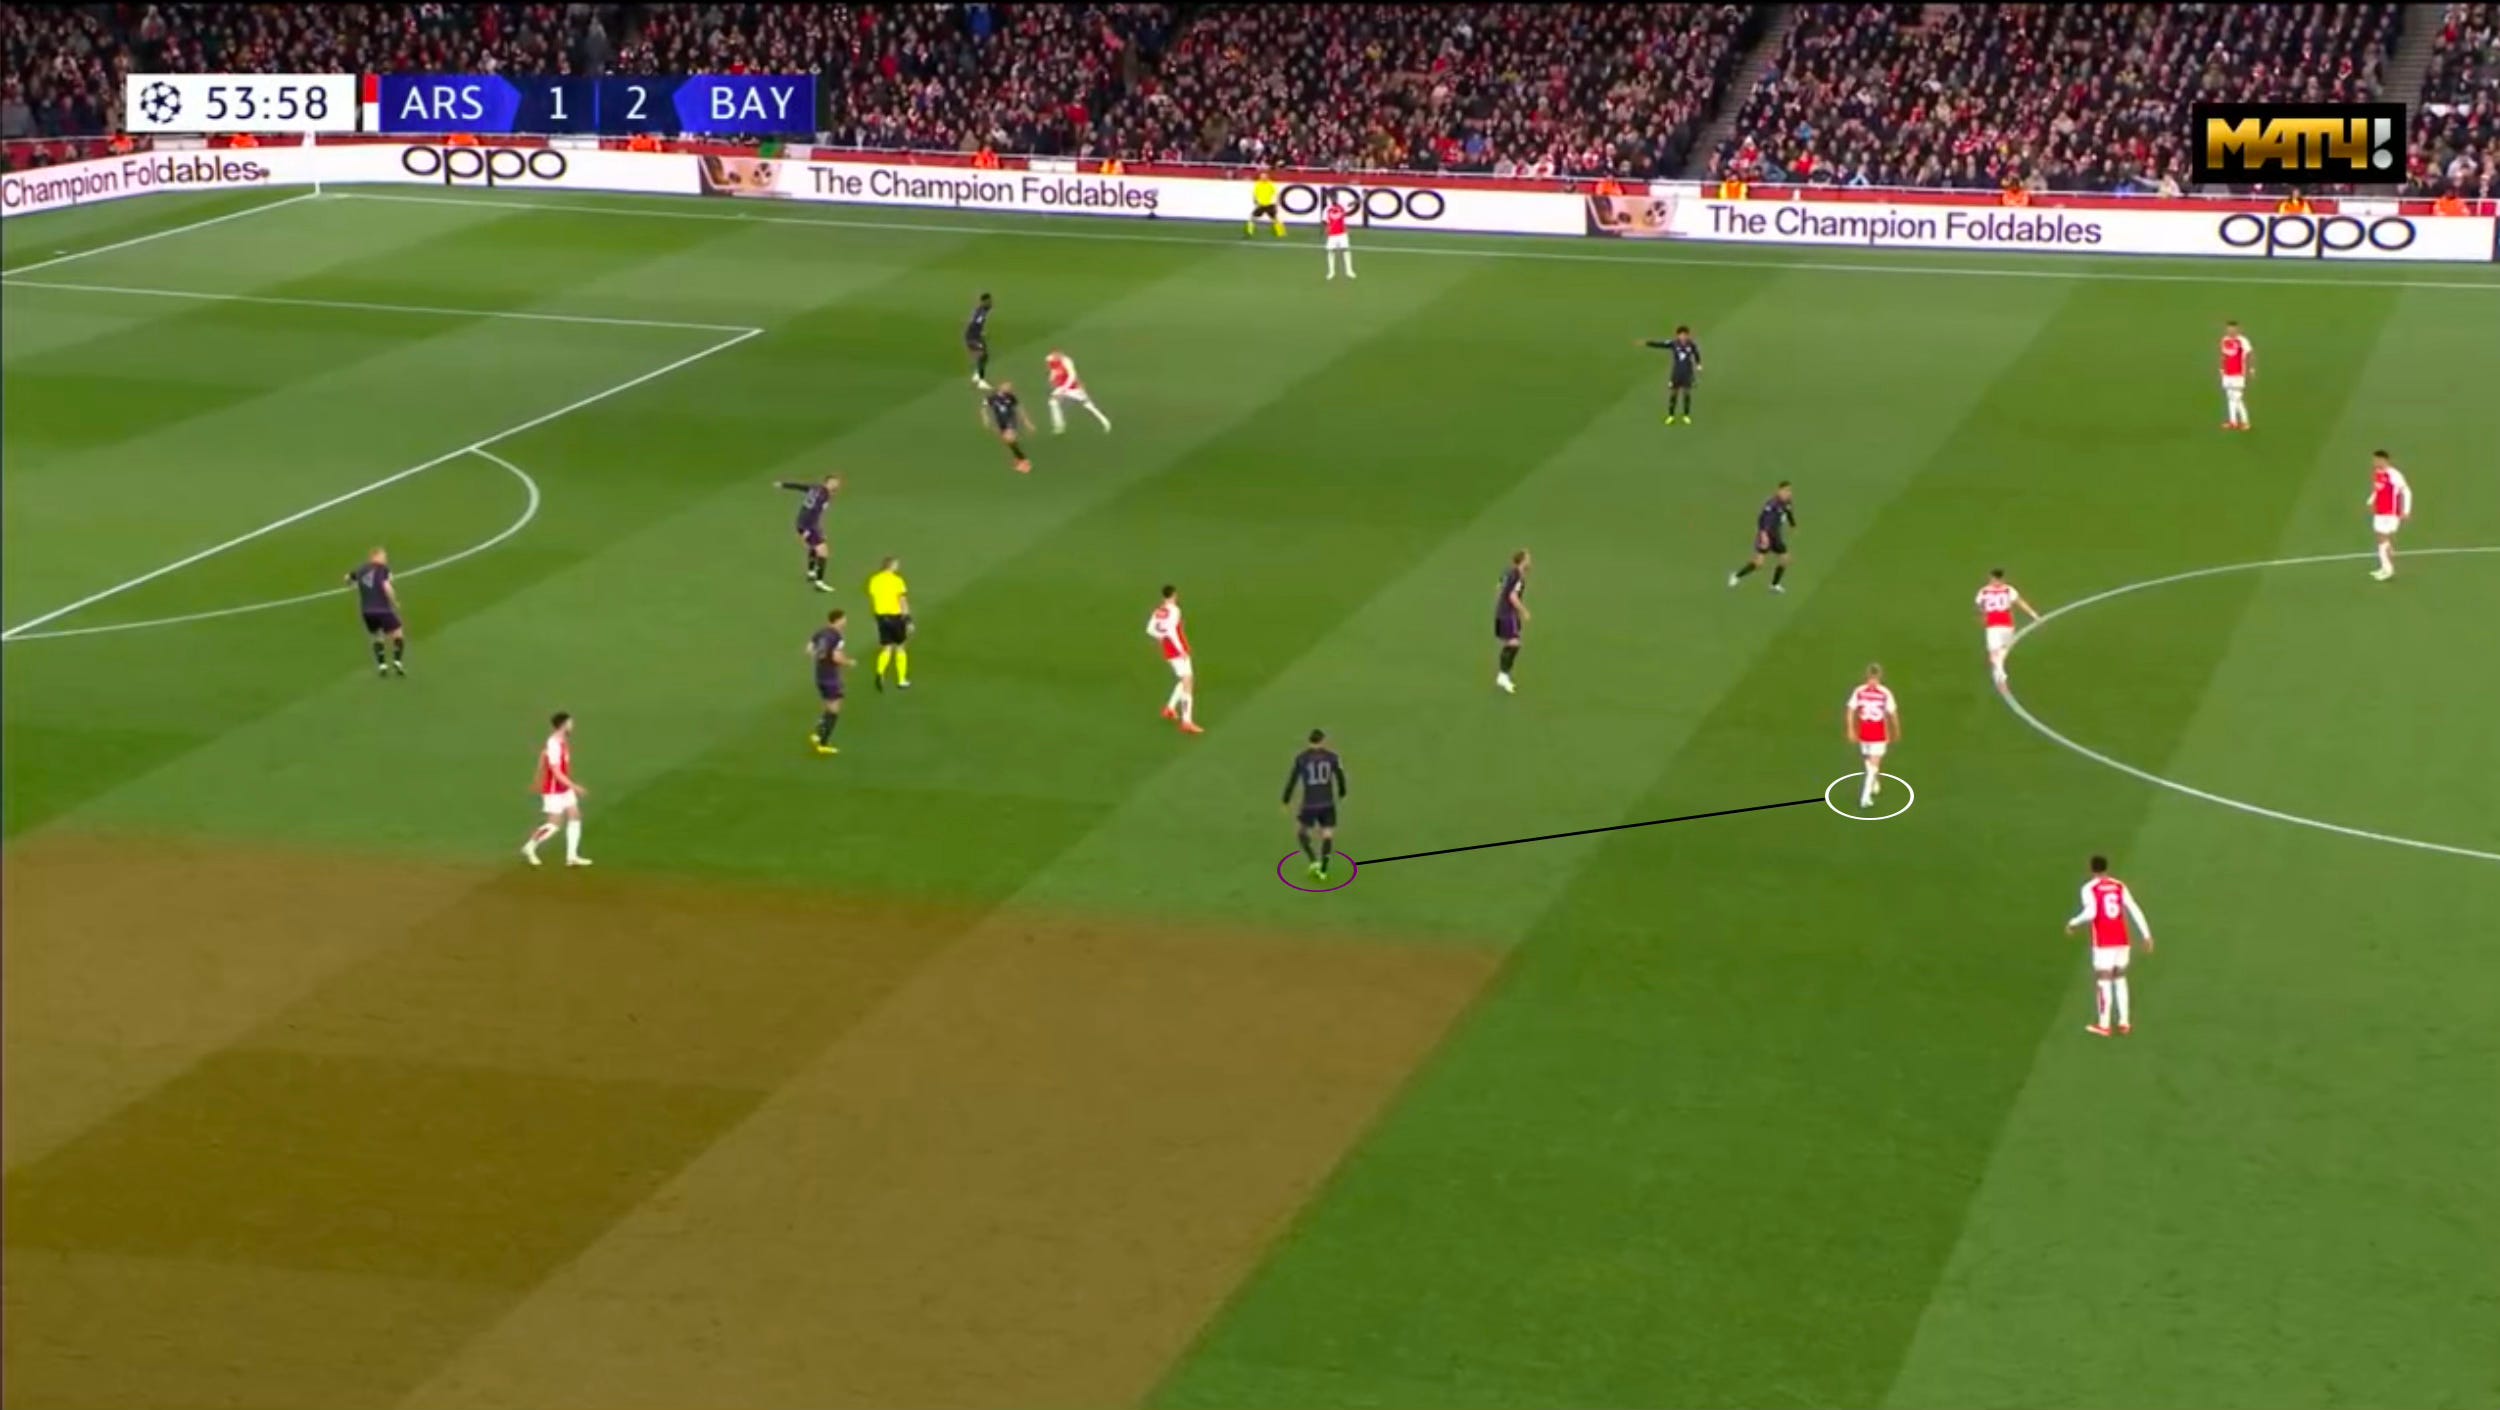
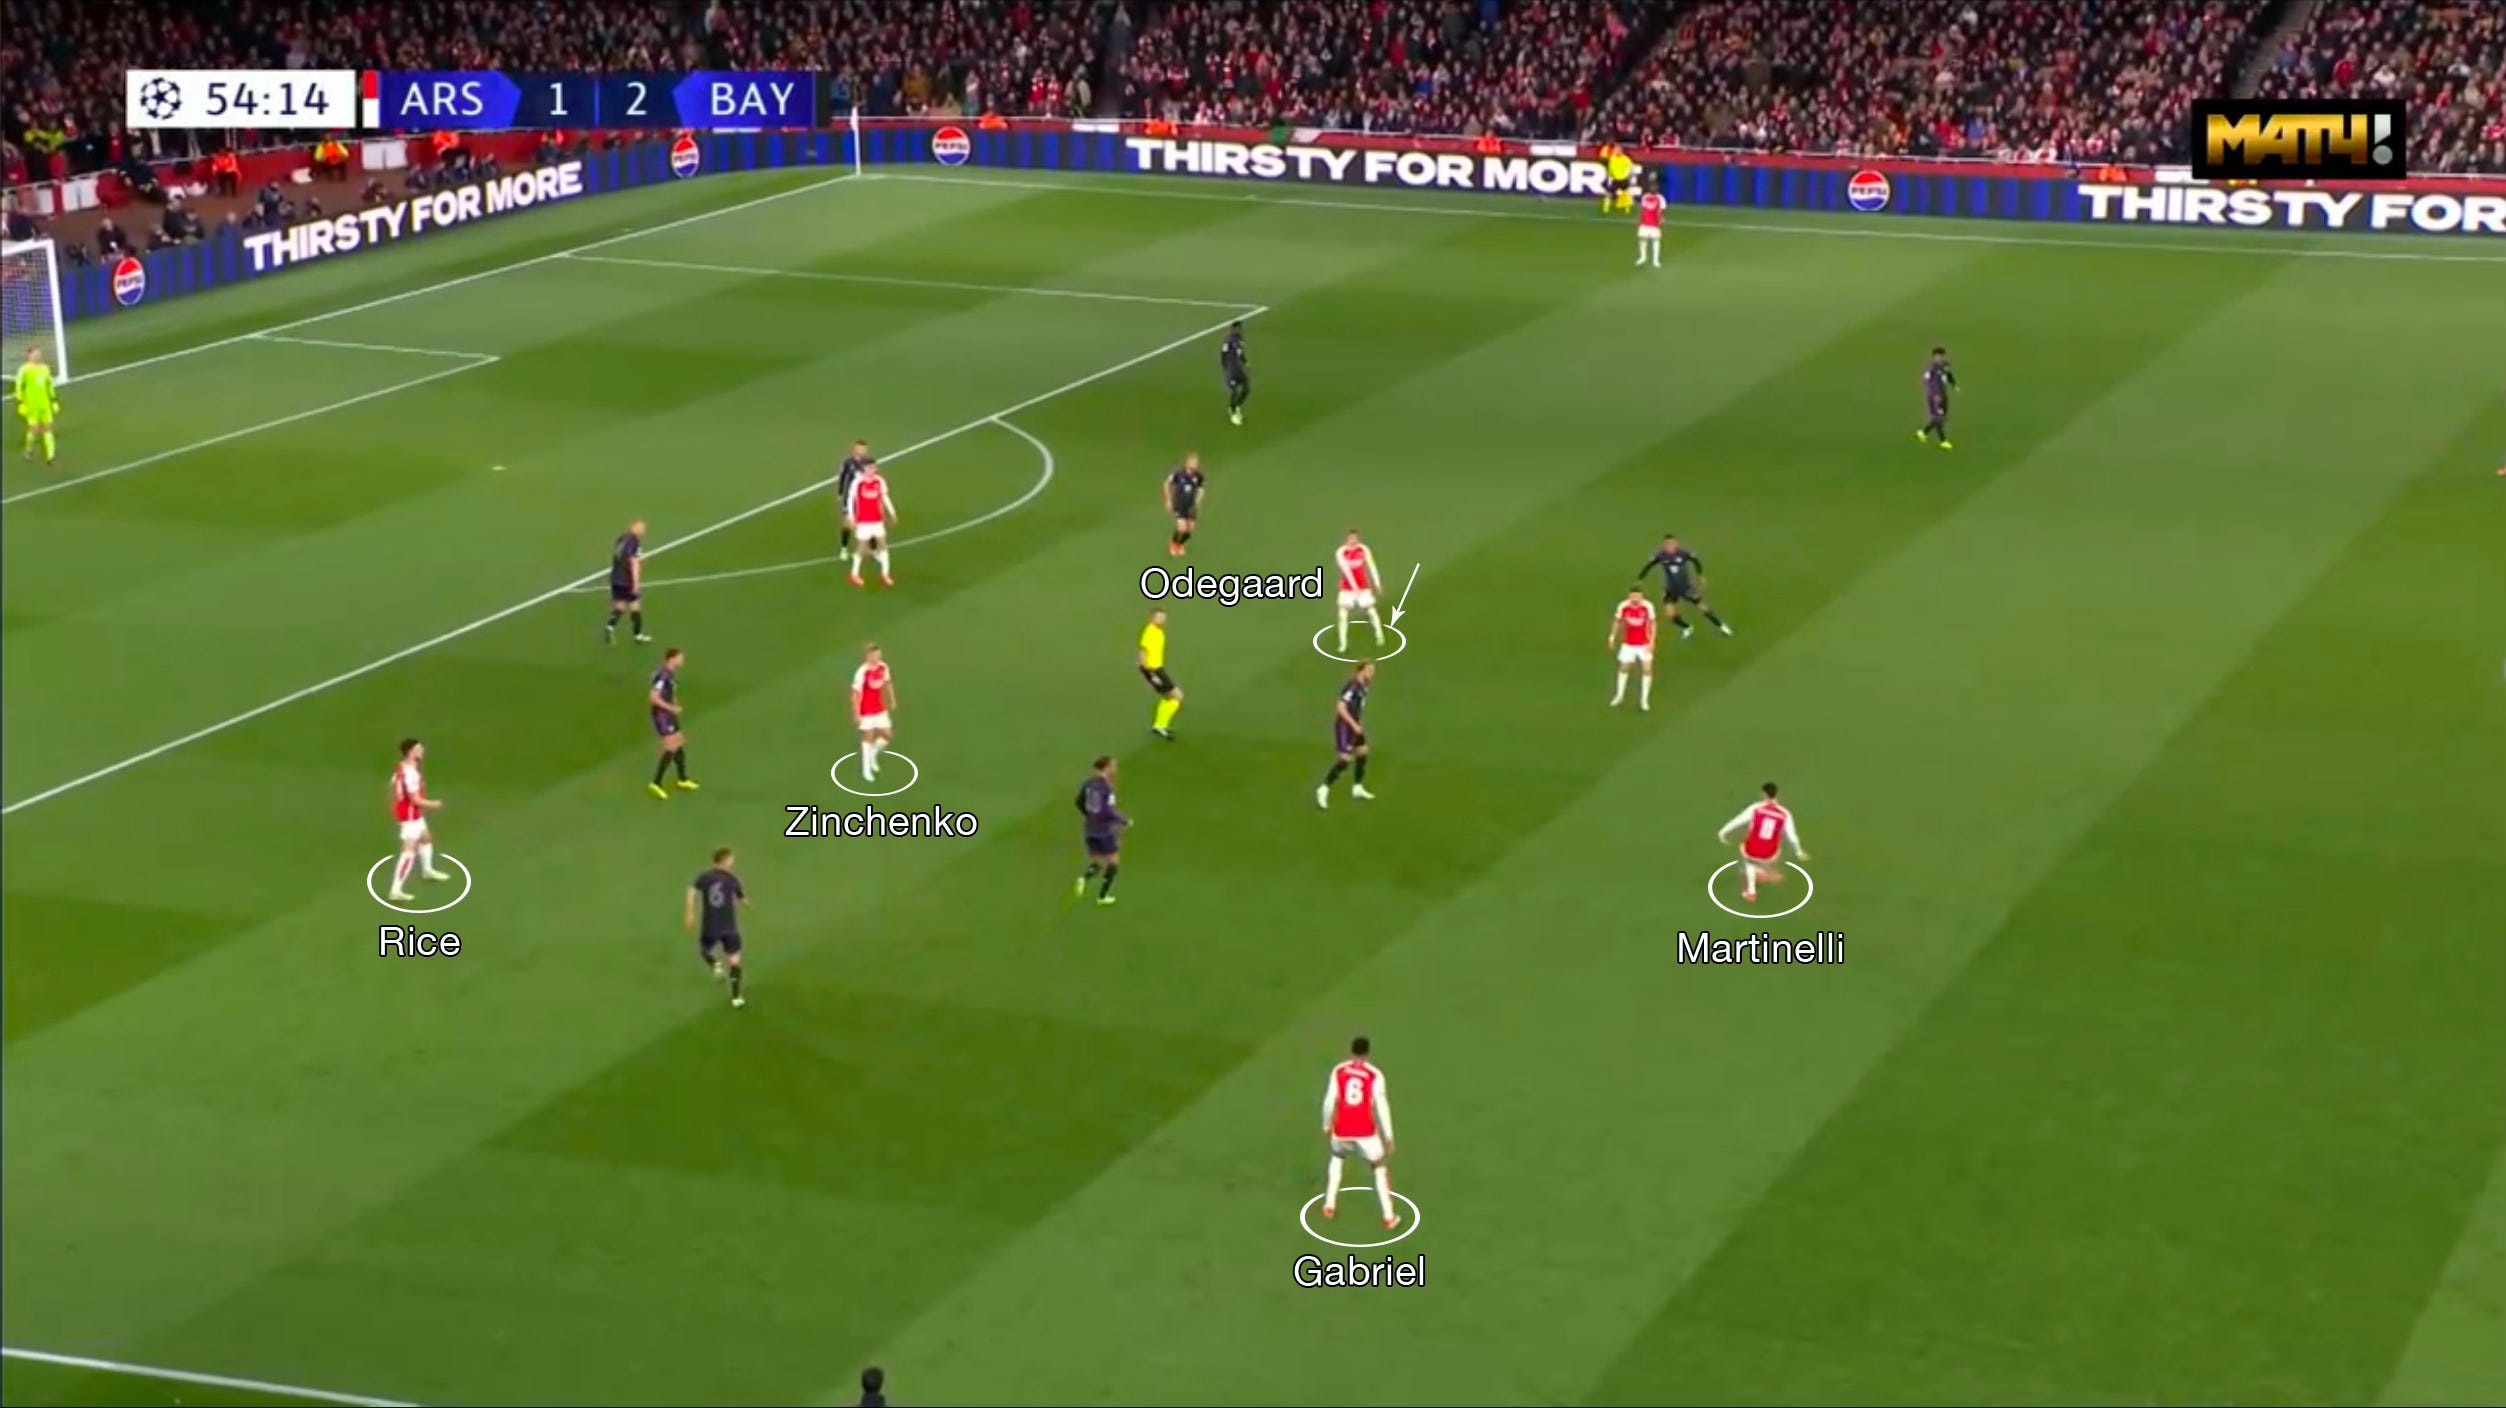
Zinchenko and Jorginho, as the nominal double pivot, would often then split. They were usually then positioned either side of the strikers (1 deep, 1 ahead), with the deeper of the two using the security of the back-three to be able to pick up and probe with the ball across the face of Bayern’s 1st line, waiting for the right wide ball to release.
What was also became the case more often was White starting in the back-three as a way of pinning Gnabry high to stretch the space between the lines. With Ødegaard now being positioned much closer to the last line in order to pin Laimer, there were then opportunities like these for the higher of the two nominal #6s to offer freely behind the Bayern 1st line, at least initially, undetected by Musiala.
This play in and of itself may only result to a simple connecting pass wide that is eventually forced back, but these little incisions are absolutely key to Arsenal continuing to impress on their opponents in order to force them deeper.
Zinchenko also injected a lot of fresh air into the 1st phase. His rotations in and around Bayern’s front 4 did a lot to pin them, and his agileness and distribution qualities were then able to maximise what could be achieved from the middle. This, in tandem with the more freed up movement of Jorginho, and supporting rotations from White and Rice, helped lead to more situations where Arsenal freely accessed the halfspaces in ways that had been a luxury, and with ball-holders better equipped to release incisive passes into them quickly.
In this move, Zinchenko’s in-to-out-to-in rotating does so much to create an overload that prevents Sané from pressing out onto the ball-holder, before then taking over that phase of buildup himself. With White and Rice actively reacting to Jorginho’s whereabouts, too, Arsenal are able to circulate back and forth freely, looking for those small resets to the middle that reopen the halfspaces.
The disappointment here is in the execution of the final third move. Jorginho is a little guilty of shutting off his angles too early with his outside-of-the-boot 2nd touch, but equally, Ødeagaard and Rice are passive in their movement, despite Havertz looking to open up the centre with his run.
However, the magic of the reset is that it weaponises these passivities, as Havertz’s continued, standout, movement wide frees himself of Dier and makes him the free man out wide. It’s the sort of untrackable move wide that is a staple of these reset plays.
He is guilty of not watching the line well enough to stay onside, though, and perhaps he should’ve spotted the cutback lane into Ødegaard before shifting to deliver at the byline, but it’s another great instance of exploiting the opposition block by shifting quickly against the grain.
In another case, we see how flooding the 1st phase with bodies allows Zinchenko to distribute and locate Martinelli directly without him having to deal with being doubled up on.
Getting the ball wide into Martinelli’s feet versus Kimmich alone was something that hadn’t really been achieved up to this point. And, although he did still struggle in isolated positions, the access was enough to establish greater area control to then manipulate that side through exchanges.
In the 1st half, Bayern blocked left-sided passages very compactly like this, with a very dense shape that was staggered to ensure the angles for passes were tight. It was more about zonal suffocation than man-to-man suffocation, but it worked especially well since the players that make up the left side aren’t gifted ball-handlers or combiners.

Compare that to this instance, where Zinchenko’s position on the inside continues to encourage Sané to remain very narrow and his ability to play this sort of quick pass evades so much of the suffocation that was previously seen.
It’s fine that this little passage runs into a wall because the rotations as play resets towards the 1st line then allow Arsenal to exploit the gaps. You now have Gabriel over as the spare man – who Martinelli, in textbook fashion, only laid the ball to once he’d split his position, so to avoid follow-on pressure from Kimmich – for security.
You then also have Martinelli where Zinchenko was, Rice where Martinelli was, and Zinchenko where Rice was. Not to mention Ødegaard’s higher position helping make moves across to the left side and distancing himself from Laimer easier.
As much as I sound like a broken record saying so, this move unfortunately falls short because of the final action. Zinchenko is very well-placed to deliver a cross from a great angle but the ball falls disappointingly far short of Havertz’s promising back-post run.
This continued to plague many more moves to come. Here, we get to see another example of that Ødegaard shift across that gets him on the ball, as well as what Zinchenko is able to offer in the way of quick, incisive releases.
However, the final action is lacking. It’s too harsh to criticise Ødegaard, so the blame has to instead be laid on Martinelli for his brash, first-time effort that he was not well set enough to justify taking on. Ideally, he would’ve controlled and fielded another inside ball to Havertz’s back-post run.
Similar occurs a minute later after Zinchenko does well enough to force the issue versus Sané from behind.
Ødegaard receives in space but doesn’t lift his head here, either, so doesn’t see Saka’s run. Given his momentum, a ball into feet might’ve carried the winger through. Instead, the alternative layoff that’s easiest for the Norwegian to see is cheaply played just behind the Brazilian.
As play recycles back following this sequence, Zinchenko is there to poke holes in yet another opening, this time from his actual left-back position.
It’s plain to see how much more exposed the Bayern shape is with this greater level of control versus a more zonally-oriented shape. The area’s flooded with options and Zinchenko’s the right man to play the pass to feet but Havertz wastes the box access with a cheap dive off the back of another slightly unsteady ball control.
Super subs
It’s in these areas where Arsenal were crying out for a bit more composure and control to piece together what was missing, and that came in the form of Trossard and Jesus.
There’s definitely an argument to be made that Jesus would’ve been a valuable change at half time, too, given Martinelli’s ineffectiveness away from isolated duels close to the box, which were a complete rarity. Him in the sorts of situations Havertz was just shown to be in, and playing off of Zinchenko’s passes, would’ve likely yielded a fair bit more success in that time.
The Brazilian came on to be the #9, looking to exploit the growing gap that had emerged between Bayern’s double pivot due to Laimer’s marking of Ødegaard and how frequently Arsenal were stretching their shape side-to-side.
The precision and impact Jesus was able to have was evident from his 1st touch.
1st example
This drop from to receive through the gap, with a well-weighted layoff, enabled an effective up-back-and-through passage, which Jesus was later there to benefit from with his byline run. Beyond sewing the move together was his composure once he was locked into a 1v1 with few good options, as he was patient and probed for the space he needed to then find the free teammate at the edge of the box.
2nd example
Once again, in this move, Jesus continues to drop away from the CBs and exploit the space in-between Bayern’s double pivot. From there, he doesn’t flinch at the idea of attracting the presser’s challenge to then open up the lane into the far side.
Unfortunately, the teammates surrounding him were still just letting these little moments go to waste, like with Saka’s control of that pass across. If he traps it dead, with White on the overlap, there’s a good chance he’s able to cut in and loop it to the trio of options at the back-post, rather than having to do so with a very straight trajectory and no space to hit across the face of goal.
3rd example
His early connecting play, here, helps keep Ødegaard open briefly, which then results in a successful attempt at the failed exchange between him and Saka that we saw earlier, as Saka timed his drop across well.
What follows speaks volumes of what Jesus is able to do under pressure and the faith teammates have in him, because Saka’s pass carries some risk but he knows Jesus can hold it up, as he does. And, Jesus picks just the right time to lay it off to White so that Saka has had enough time to make the 3rd man run.
4th example
That instance wasn’t backed up by much but was the most clear cut case of the substitutes showcasing a level of composure in the final third that truly made the difference.
Jesus had all the calmness and wherewithal to not fire early and somehow spot Trossard’s underlap. And, if you’re going to back anyone on the pitch to produce a finish as clinical as that, it’s probably Trossard.
Also worth shouting out another thankless bit of movement from Havertz to pin that space for the Belgian.

Wasted control
For all the positive control Zinchenko brought, he, and others, were guilty of overplaying and forcing on direct progression a little too often, especially compared to how Ødegaard and co. went about doing so in the 1st half.
This was a prime example of such, with Zinchenko trying to flaunt his passing ability playing the type of eye-of-the-needle pass that Arteta tends to discourage, especially over broad distances where the support is outnumbered.
It’s for good reason that these kinds of passes, where risk outweighs reward, have been trained out of most passages when you see the resulting counter, as Bayern continued to exploit the space just in front of the back-4 to move the ball side-to-side.
Those riskier moves and passes became especially costly late on when Arsenal had been successfully pinning Bayern back.
A dribble like this from Zinchenko carried more risk than necessary – a simple dribble to entice the strikers before laying wide to Rice would have sufficed.
With Rice not wanting to get drawn in to confronting Laimer high up from his temporary RCB position, Bayern continued to force retreats through the spaces wide on either side. And, with Arsenal’s aforementioned stretched block being pulled as wide as possible by Bayern’s patient ball circulation, it was tough to turnover possession.
The gaps allowed for CBs, who waited for those right moments, to play directly into the feet of the forwards dropping from the last line. They were well-equipped to control the ball and draw fouls or hurdle the challenges and exploit the space inside if they weren’t well pressured.
To give you an idea of the scale of the cost of these minor, avoidable errors: Arsenal didn’t gain back possession for a whole 2 minutes after Zinchenko lost that ball. That is a massive amount of time to lose deep into a game when you are searching for a goal and have the time to patiently craft moves. Recycling and resetting repeatedly in that time is something that you could imagine might have eventually forged an opening for the hosts but they yielded by dicing with unnecessary danger.
Post-equaliser, Bayern actually dominated possession 56.3% to Arsenal’s 43.7%.
We see the same, here, from Trossard, whose pass’ risk outweighs its reward. It might be intended to sweep across to Ødegaard/Saka but the margin for error is so slim that it unsurprisingly results in a lost ball. Partey, for all his woes in his brief cameo, at least showed the most experience in stopping the move from breaking out.
And, the resulting spell of possession Bayern gained, nearly led to a winner.
Arsenal had been a little headless in aerial duels for much of the match – it was another signifier of their nerves – and here was no different. It shouldn’t seem possible for Partey to mess up the header the way he does, but he does. The lack of communication thereafter from Saliba and Gabriel sees both challenge and lose the same ball, leaving Musiala free ahead.
With White passively enabling Musiala to creep closer in and eventually get off his low cross, Zinchenko allows Coman to ghost across to the near post without communicating anything to Gabriel.
Arsenal were spared by the post.
There was one specific passing routine that had threatened to break Bayern open a little more. As alluded to earlier, White’s deeper position helped stretch the space for the #6 to offer as the 4th man on the near side, while Ødegaard pinned Laimer deep and Saka stayed wide. Saka could then either receive to feet and recirculate or make a run off the shoulder.
White being deep drew out Guerreiro (Gnabry’s replacement) while the nominal #6 moved across to exploit the halfspace gap that formed because Guerreiro often pressed from the outside, rather than staying tucked in zonally.
These weren’t always successful. In this later example, where Zinchenko passes and moves to fill the same space, the gap is much tighter as Musiala has seen the Ukrainian’s movement, so is alert to cutting it out. It’s a pass that files under overly-forced entries, not least because better prior examples maximised the space between Musiala and Guerreiro due to the fact the #6’s movement went far less detected.
However, this strategy almost won Arsenal the match. Whilst the angle is still fairly tight, here, the #6 drifting in off of Musiala’s blind side means the Bayern player is less alert to the threat, so he’s not as prepared to intervene.
It’s unclear how much of the pass is from Partey and how much is from Musiala’s challenge but Saka’s repeated out-to-in run in response allows him to go clean in behind, here. Now, whatever your stance is on whether it should’ve been a penalty or not, whether he made a meal of Neuer’s approach or not, this had major goal-winning potential, regardless of what way Saka went about it.
Conclusion
This was another occasion in which Arsenal’s big game nerves were put under the spotlight and scarcely passed the test. Both offensively and defensively, there were flaws, technically and in the way of decision-making and execution, which prevented Arsenal from taking this match.
That said, ending without defeat is potentially crucial to the tie. Arsenal, in these bigger matches, are more comfortable digging deep defensively than they are threading the needle, and Bayern are also more comfortable defending and breaking than they are building chances from controlled spells of possession. So, the scoreline and where the 2nd leg is being played, should allow Arteta to flip the dynamic in Arsenal’s favour next week. It doesn’t mean Bayern won’t have the quality to break the Gunners down, but you’d expect the deep block to be much more compact and there to be clearer cut chances for the Gunners in transition, should the scoreline remain out of Bayern’s favour.
~
Thanks for reading, hope you enjoyed it. You can find me here.
Brilliant! What a fascinating read